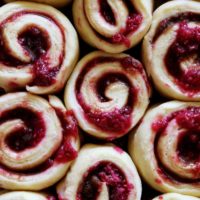
Overnight Raspberry Buns With Crème Fraîche
A delicious overnight dough paired with raspberry quick jam and a crème fraîche glaze -- yum!
Print
Save
Servings: 12
Ingredients
- For the Dough
- 1 package instant or active dry yeast (approximately 2 1/4 teaspoons)
- 1 cup buttermilk (milk or water, warmed)
- 4 cups all-purpose flour (plus additional flour to keep it from sticking + dusting your surfaces (use as little extra flour as possible))
- 1 stick (4 ounces unsalted butter, melted and cooled)
- 1/4 cup granulated sugar
- 3 large egg yolks (room temperature)
- 1 1/2 teaspoons sea salt
- 1 teaspoon cinnamon
- 1 tablespoon vegetable oil (for the bowl)
- For the Quick Jam
- 3 cups raspberries (about 2 half pints; cleaned)
- 1/3 cup granulated sugar
- 1 tablespoons each zest + juice (about 1 lemon)
- For the Filling
- Quick raspberry jam (recipe above)
- 1 cup fresh raspberries (1/2 pint; cleaned)
- 1 cup brown sugar (packed)
- 2 teaspoons ground cinnamon
- For the Icing
- 2 cups powdered sugar
- 3 tablespoons crème fraîche
- 2 or more tablespoons of milk to thin
Instructions
- Put the yeast and warm buttermilk (or whichever liquid you're using) in the Prep&Cook fitted with the serrated knife kneader. Press P1 and after 30 seconds, add in flour, melted butter, egg yolks, sugar, sea salt and cinnamon and let the Prep&Cook finish mixing. When the kneading has finished, take the dough out of the mixer, knead 10 times to form a nice round ball and return to the Prep&Cook to rest during the warming stage. Without the Prep&Cook: Mix the yeast and buttermilk in a large bowl and let mingle for 5 to 10 minutes. Add in the flour, melted butter, egg yolks, sugar, sea salt and cinnamon and mix until a ball starts to form. Turn out onto a lightly floured surface and knead for about 10 minutes until smooth.
- Swirl 1 tablespoon of oil around a large bowl. Set the dough inside, turning to coat completely with the oil. Cover the bowl with plastic wrap and set in the fridge for at least 12 hours and up to several days.
- To Make the Raspberry Jam, add 3 cups of raspberries, 1/3 cup granulated sugar and 1 tablespoon each lemon juice and zest to a medium-size saucepan. Bring to a boil, mashing the berries with the tip of a wooden spoon. Continue to boil for 6-8 minutes or until when you drag a spoon across the bottom of the pan it leaves a track. Let the jam cool a bit and then transfer to a lidded container and stash in the fridge until ready to assemble and bake your buns.
- When ready to assemble, turn your dough onto a lightly floured surface and shape it into a 18X12-inch rectangle. You may or may not need a rolling pin to nudge it into shape. Smear the raspberry jam over the top, leaving about 1/2 half-inch clean along the longer edges. Sprinkle with 1 cup of brown sugar, 2 teaspoons of cinnamon and then finish with the remaining raspberries. Starting with the long edge farthest from you, start rolling the dough into a log towards you. When you get the end, pinch the dough together to form a seam and roll the seam side underneath. Using a serrated or sharp knife cut 12 buns about 1-inch wide each.
- Butter or spray non-stick on your baking dish (I use either a 9X13-inch casserole dish or two smaller ones, like you see in the photos) and place the buns cut-side up, allowing extra space for additional rising. Loosely cover the baking dish with plastic wrap and allow to rise for 1 1/2-2 hours or until double in size (or follow the instructions for a quick rise as noted above).
- Preheat your oven to 350 degrees F with a rack in the middle of the oven and bake the buns for 20-25 minutes or until lightly bronzed and an internal temperature reaches 190 degrees F.
- While the raspberry buns cool, whisk together the powdered sugar, crème fraîche and milk. You want the glaze to be thick enough to stay on top of the buns, but thin enough to drip down the sides. Spoon the glaze over the tops of the buns and serve!
Thanks for baking with me! Please rate + comment this recipe and tag me on social @displacedhousewife #displacedhousewife so I can see your beautiful treats! xo