The Best Overnight Yeast Waffles Recipe
The most delicious overnight yeast waffles are the easiest, fluffiest, crispiest batch of waffles you'll ever make. Just a short 10 minutes to mix together the ingredients and then let the batter sit on the counter overnight. In the morning, as your waffle iron heats up, whisk together the eggs and leavening (baking powder and baking soda) and your waffle batter is ready! These will quickly become your new favorite waffles! These can be made with store-bought yeast or your sourdough starter. Enjoy! xx
Print
Save
Servings: 8 waffles
Ingredients
- 2 cups (480 g) milk (use 2% or higher fat)
- 6 ounces (12 tablespoons/1 1/2 sticks/168 g) unsalted butter, (cut into 12 pieces)
- 2 1/4 teaspoons (1 packet/7 g) active dry yeast (or (120g) active sourdough starter)
- 3 tablespoons (36 g) granulated sugar
- 1 teaspoon real vanilla extract
- 1 1/4 cup (170 g) all-purpose flour (how to measure flour)
- 3/4 cup (90 g) white whole-wheat flour
- 1 teaspoon sea salt
- 3 large eggs (room temperature)
- 2 teaspoons (10 g) baking powder
- 1/2 teaspoon baking soda
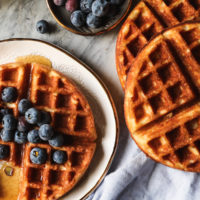
- To Serve: Real maple syrup, blueberries and all of the toppings that give you joy
Instructions
The Night Before
- In a large microwave-safe bowl add the milk and butter and run the microwave on high until the butter is melted. This takes a little over a minute in my microwave. You could also do this in a medium saucepan over medium heat on the stove. Stick your finger in the liquid, if it feels hot, hold off adding the yeast until it gets closer to body temperature. If it feels cozy and warm, the yeast will likewise find it cozy and warm. Once the temperature feels right, add in the yeast or starter and let it sit for five minutes or so. The yeast should get a bit frothy.
- When this happens, add in your sugar, vanilla, all-purpose flour, white whole wheat flour and sea salt and use a whisk to fully incorporate the dry ingredients into the liquid. This is completely contrary to the way you mix traditional waffles (they're best when the batter is a bit lumpy). Ignore the instinct to leave it lumpy, and blend completely. Cover with plastic wrap and let sit on the counter overnight.
In the Morning
- Turn on your waffle iron to get it nice and hot to yield the crispiest waffles. On my maker, that means the temperature is set to 4 1/2. If your waffle iron isn't nonstick, brush the top and bottom with melted butter.
- In a medium bowl whisk together the eggs, baking powder and baking soda and then fold into the waffle batter until blended. Pour the batter* into your waffle iron (my waffle maker takes about 1/2 cup) and set the timer on 4 minutes…your waffle maker may cook faster or slower. Use that number as a ballpark depending on whether your waffle iron runs hot or cool.
- If you’re serving a crowd, you can double the recipe and have the oven on a low 200°F/93°C. Set a cooling rack on top of a cookie sheet and place in the oven. Set the finished overnight waffles on the cooling rack in the oven as they come out of the waffle iron. Ideally, you serve the overnight waffles as soon as they come out of the waffle iron. They’re best that way.
- We like to sprinkle with powdered sugar. It looks pretty. Always 100% pure maple syrup in our house. Sometimes we sprinkle with fruit so it’s transformed into a pious breakfast fit for Gwyneth.
Notes
*How much batter you put into your waffle maker depends on the size of said waffle maker. Additionally, how many waffles you make depends on the size of your waffle maker as well.
Thanks for baking with me! Please rate + comment this recipe and tag me on social @displacedhousewife #displacedhousewife so I can see your beautiful treats! xo