

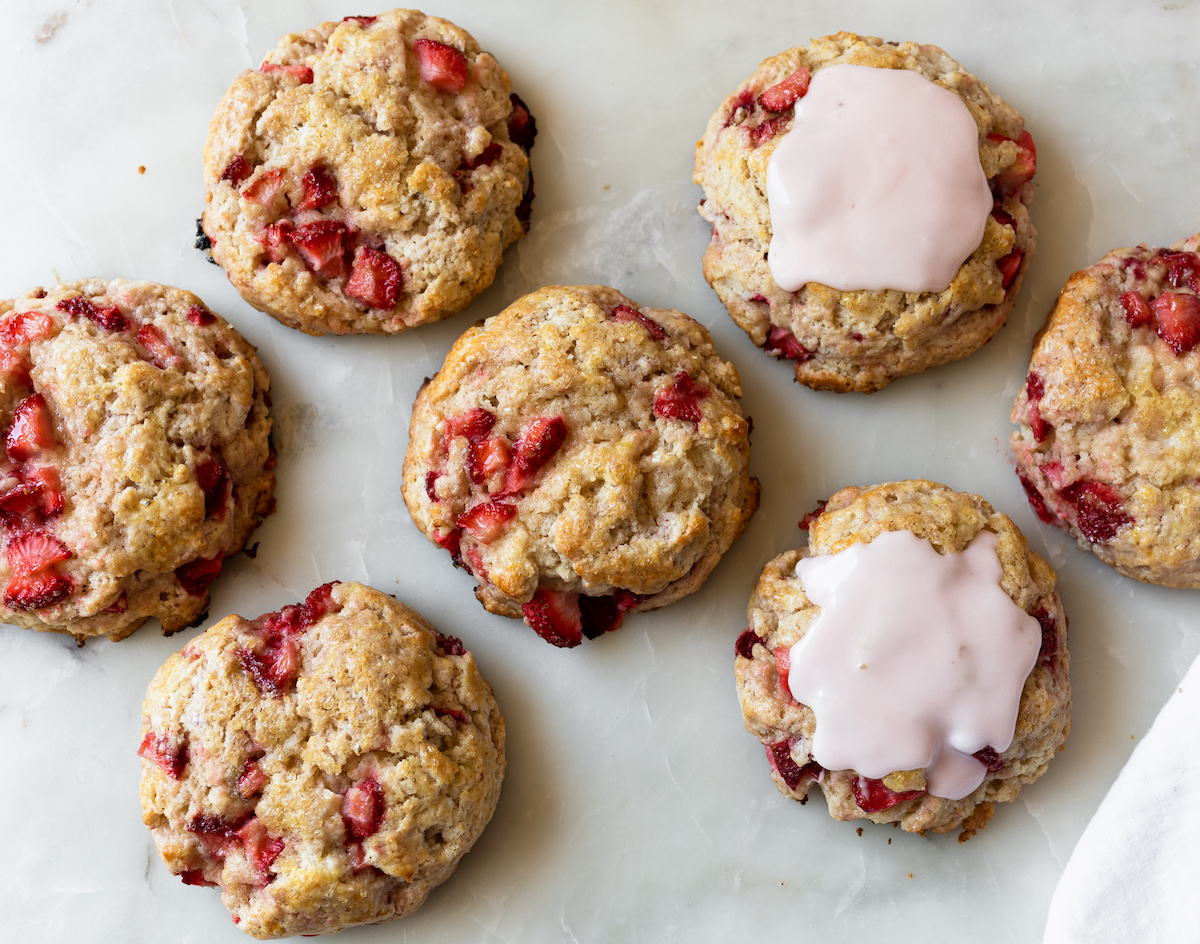
Fresh Strawberry Cream Scones are one of my favorite ways to use fresh strawberries (because there is nothing better than homemade scones!). Picture the softest, lightest scone interior loaded with fresh berries at every bite (that’s this scone!).
I have over a dozen scone recipes on my site, I love them so much! They’re so easy to throw together (once you get the hang of it) and can easily be prepared the night before and baked off the next morning (see note below).
For years I made scones every weekend for Solvang Bakery and that experience taught me SO MUCH. These are the best scones with an incredibly tender texture (this is the actual recipe I used at the bakery and it’s so easy!).
One important lesson is that since you’re using so few ingredients, always get the best you can get your hands on. Another: don’t overwork your dough! I have more tips in the notes below.
More of my favorite scones: Blueberry Cream Scones and Raspberry Cream Scones for the summer months; Chocolate Chip Cream Scones and Pumpkin Cream Scones for the fall; and Cranberry Cream Scones and Gingerbread Cream Scones for winter.
Two of my favorite season-less scones are the Maple Oat Scones with Espresso Glaze (swoon) and savory Bacon Cheddar Scones that are so good with any meal at any time of the day!
Here is a link to all of my scone recipes.

Why You Should Make These Scones
- Soft, tender scones that are super easy to make (I promise!)
- Loaded with fresh strawberries and mega strawberry flavor
- Recipe uses standard baking ingredients, nothing funky nor difficult to find
- These babies can be made ahead of time (LOVE)
- This recipe can be made with frozen strawberries (see note!)
- Can be paired with the strawberry glaze, lemon glaze or use my favorite simple egg wash (that’s in the recipe notes below) and sprinkle with Demerara or sparkling sugar
- Recipe yields 8 scones but can be made into 16 smaller scones if you’re serving more people
Let’s make some tender scones!
Step-By-Step Instructions for These Strawberry Scones
Below are step-by-step photos (with captions) to make the most delicious Fresh Strawberry Scones perfect every single time! My biggest tips are:
- Keep all of your cold ingredients cold. I’m talking about the cream, egg and butter. Don’t let them sit around sweating on the countertop. You want them nice, fresh-from-the-fridge crisp.
- Don’t overmix your dough. That’s all there is to say about that. Your mantra: a light hand reaps big rewards. Idk..you get the idea!
- In regards to the amount of cream to use… If you live in Palm Springs and there is zero humidity, use the full 3/4 cup of cream. If you live in Hawaii, you probably only need 2/3 cup of cream. If you live in a city with average humidity then use 2/3 cup plus 1 tablespoon of cream. I know this seems super specific, but it’s important stuff. Nobody wants a dry scone. I’m going to start a new campaign: #humiditymatters
To Start
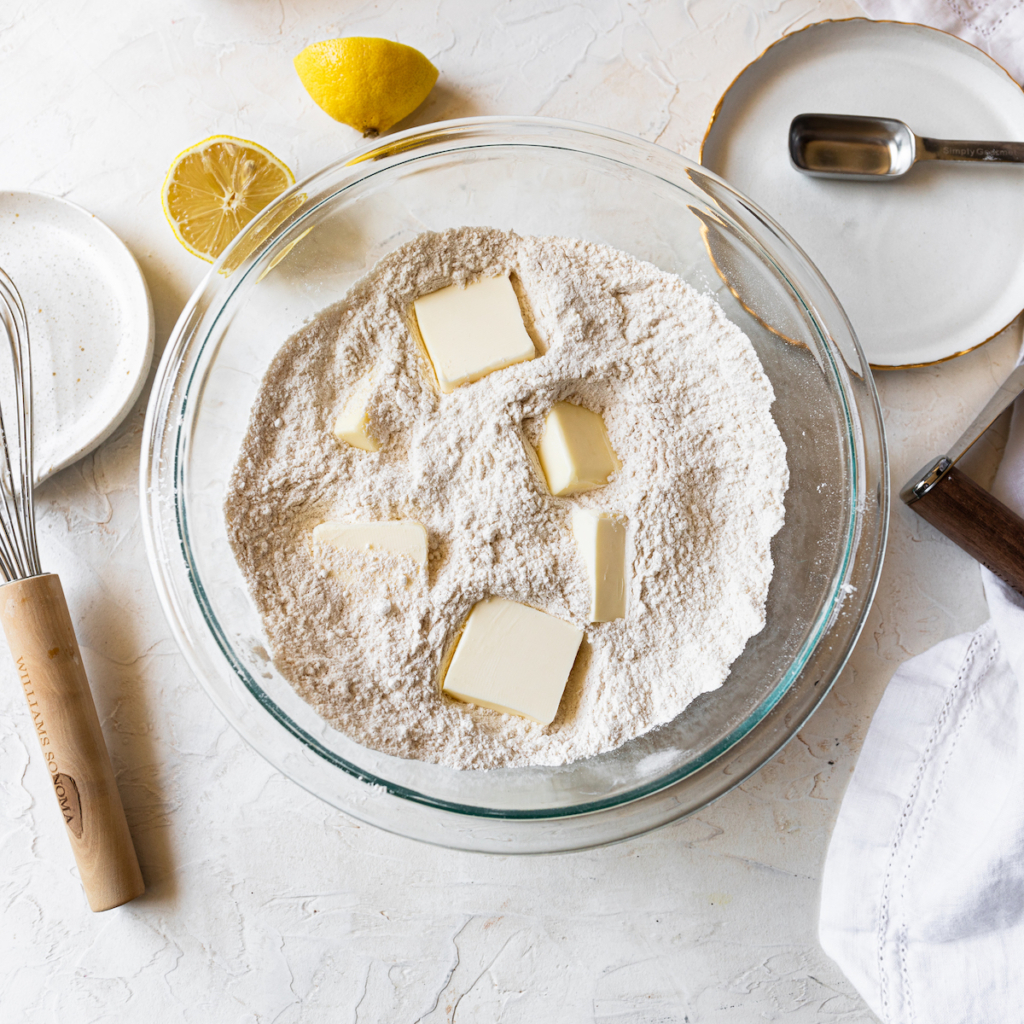
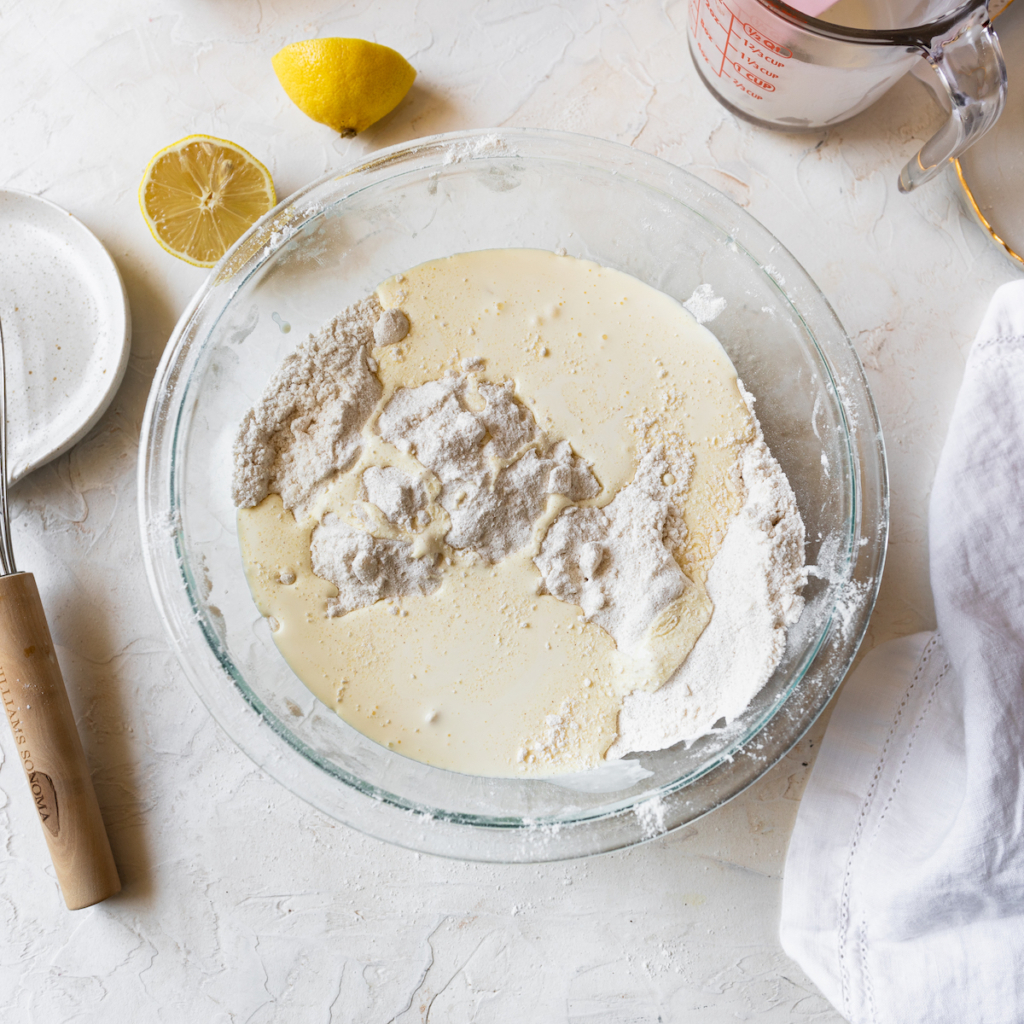
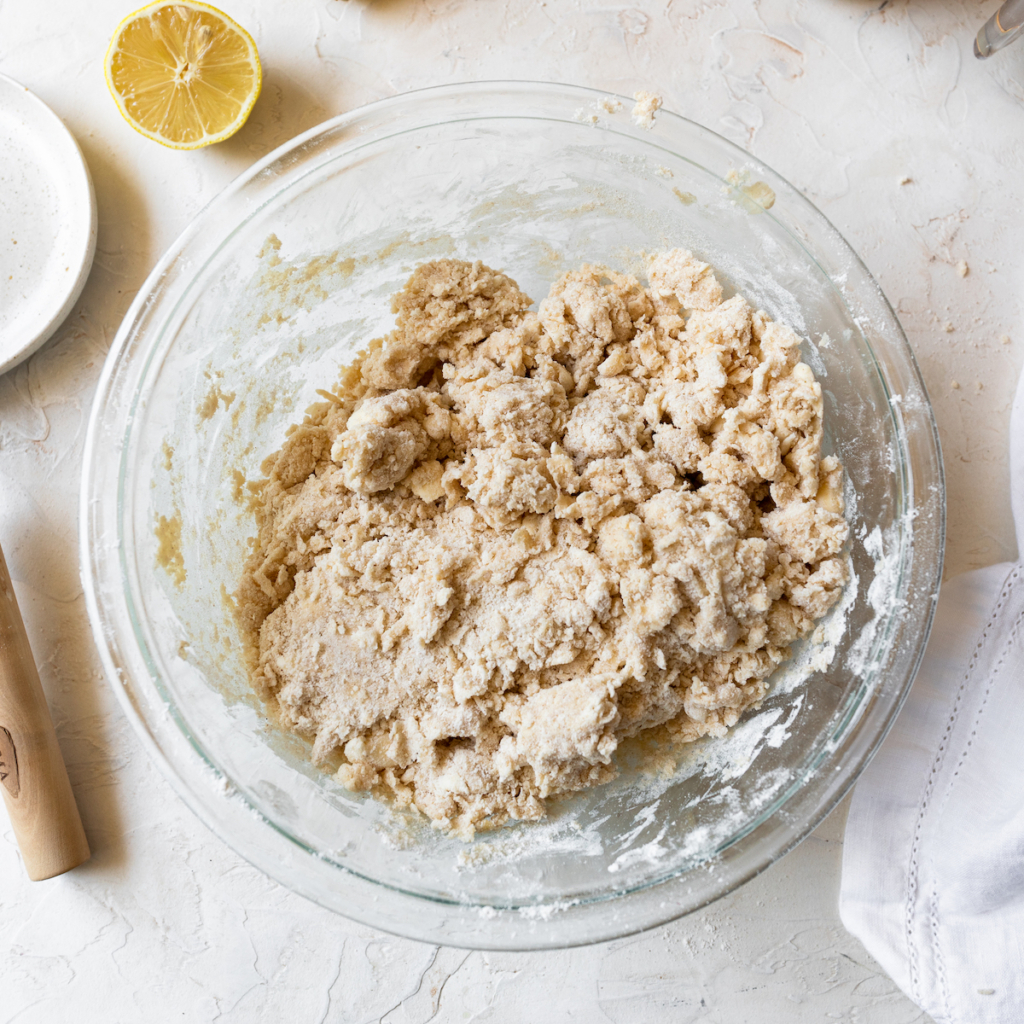
For The Scone Dough
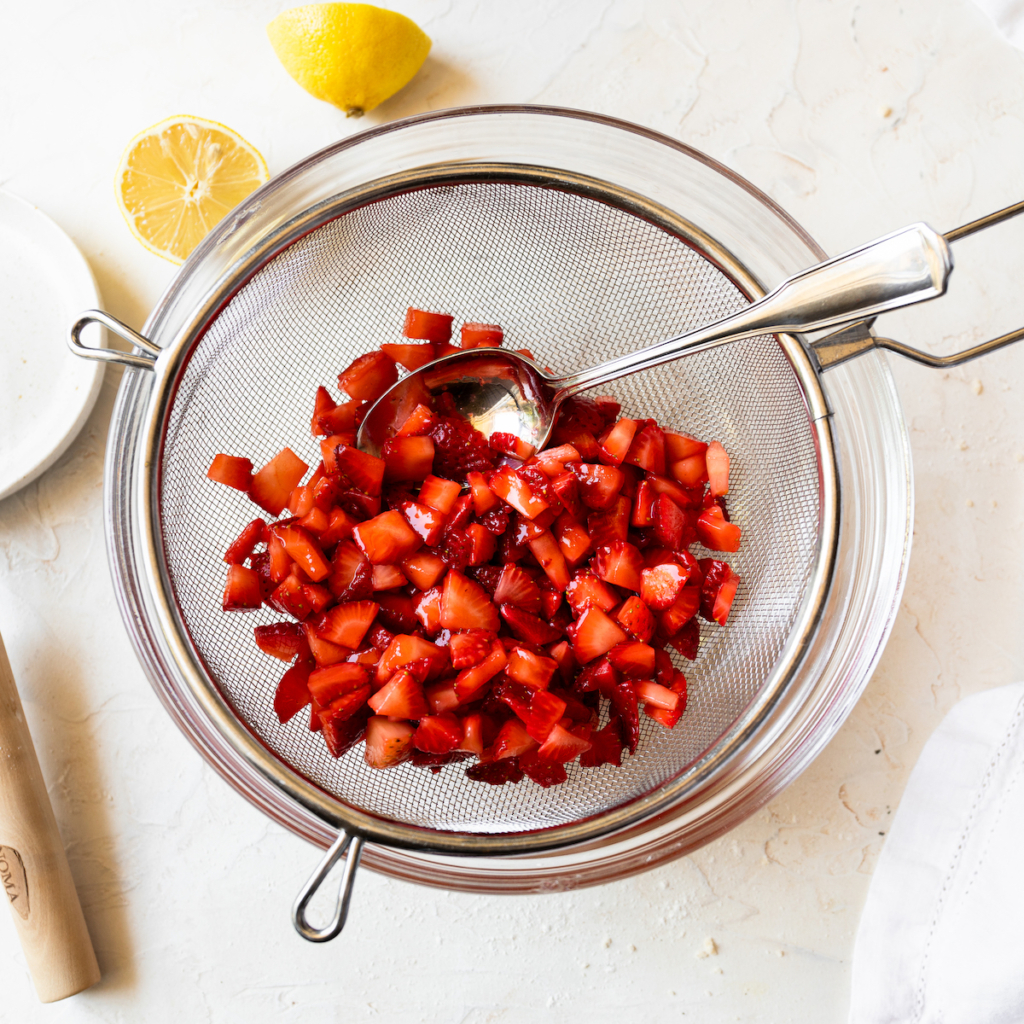
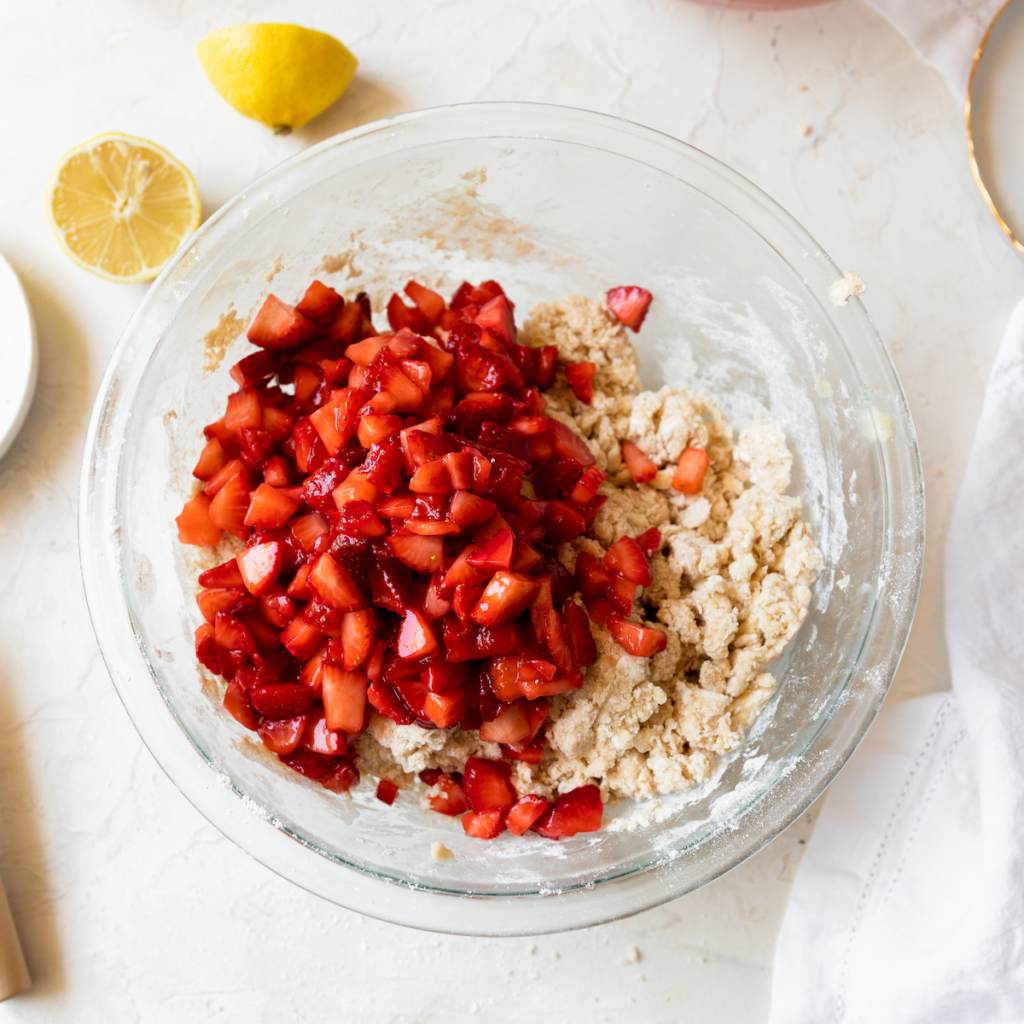
Mix in the Strawberries
Before Baking

Can I use Frozen Strawberries in Scone Dough?
Frozen strawberries do not work in typical scone dough. **However, they can be used in this recipe!**
Set the berries in a strainer to defrost for about 30 to 60 minutes. Once defrosted, proceed with the recipe. Since you’re straining out the excess liquid before adding the berries to the scones, you don’t have to worry about too much moisture in your strawberry scone dough
No need to wait until strawberry season! .
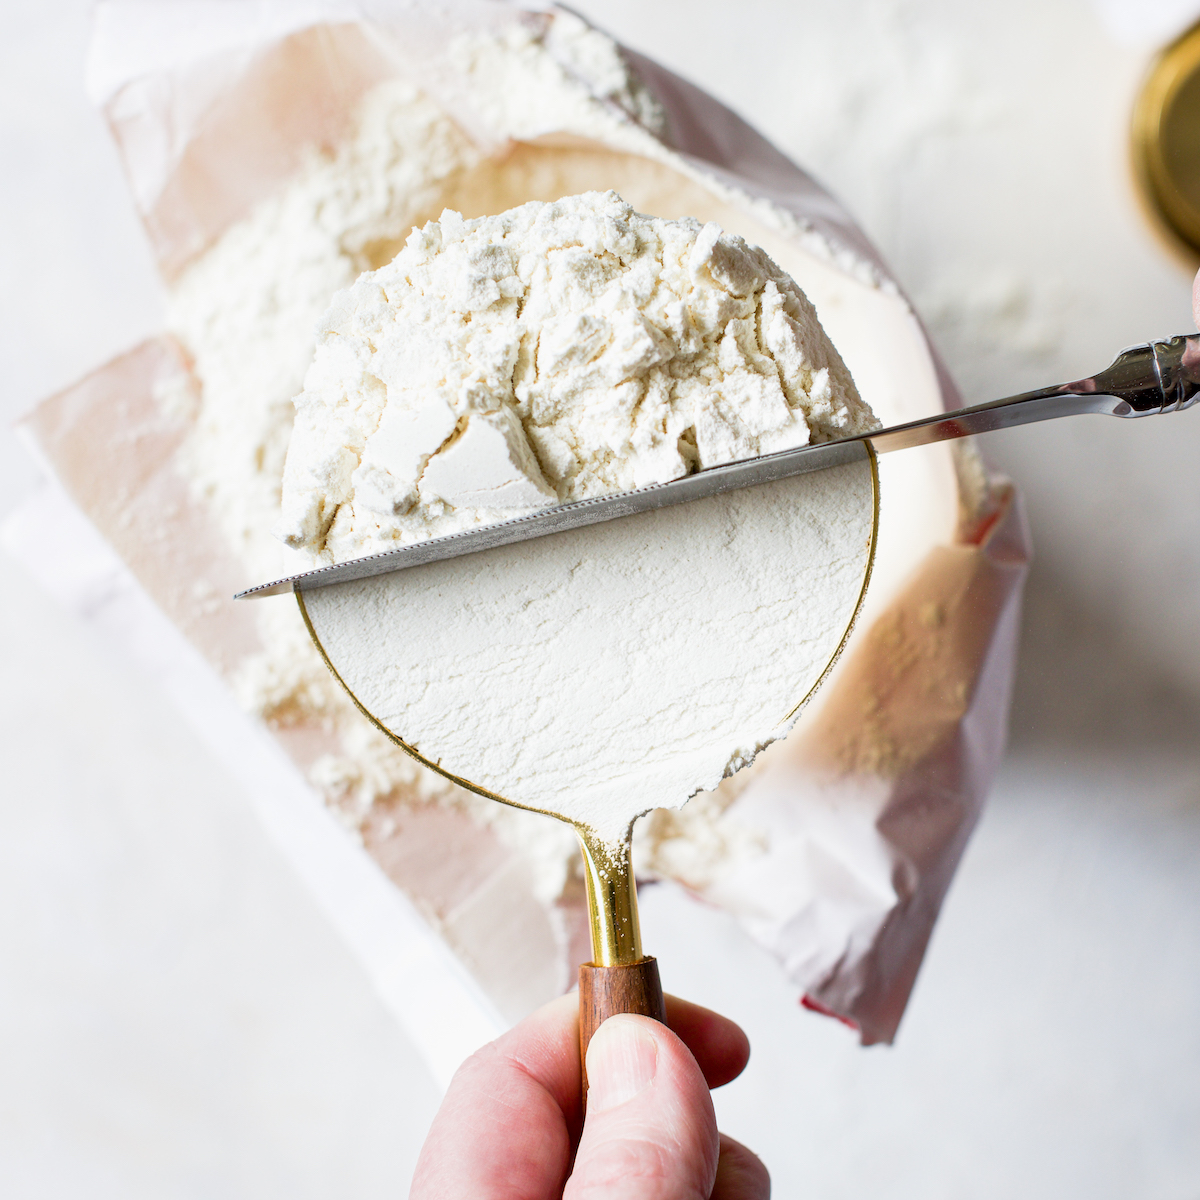
The Baker’s Guide to Measuring Flour
One of the biggest (and most common) mistakes in baking is how we measure flour. If you find yourself without a scale, see my top tips on how to properly measure flour for the perfect amount every time!

How To Make Cream Scones Ahead of Time
It’s so easy to make scones ahead of time you’re going to be blown away! Mix and shape your scones through Step 6 (in the recipe card below). When you pop them in the freezer, leave them in there to freeze solid; this should take several hours.
Once frozen, place in an air-tight container in the freezer until ready to bake.
When it’s time to bake your scones in the morning, take the scones out of the freezer and set them on a fresh baking sheet covered with parchment paper while you preheat your oven; give your oven about 30 minutes to really warm up.
Pop them into the oven and bake as normal, adding a few more minutes to the bake time to make sure they bake through.
If your freezer can’t accommodate a baking sheet:
Set the unbaked scones on parchment lined plates (that will fit on your freezer shelves) and freeze them in single layers (you’ll need several plates).

Tools for Making Strawberry Scones Fabulous
A nice Silicone Spatula for stirring. And if you really wanna go for it, this silicon spatula is great for transferring off of the hot baking sheet.
An extra-large muffin or cupcake scoop to portion the dough.
These nested, heat-safe Glass Bowls are perfect for mixing up your scones.
Don’t forget my favorite scale. I wrote both of my books with this one, it will serve you well on your baking journey!
That beautiful Williams-Sonoma whisk with the wooden handle that’s in my videos. It’s so pretty. But when I’m being practical (and not making videos), this Material whisk is THE BOMB. I love their stuff!
I’ve adding a shopping section (woo hoo!), you can check it out here!
More Cream Scone Recipes!
Scones will forever be my first love and I literally have one for every occasion and any time of year.
Some of my favorites include these Maple Oat Scones, these Blueberry Scones and you can never go wrong with Pumpkin Scones (ever).
And if you happen to have some cranberries in the freezer, give these Cranberry Scones a try.
Let’s make some Fresh Strawberry Cream Scones!


Tender Strawberry Cream Scones
Ingredients
For the Berries
- 1 pint (12 ounces or 340 g) fresh, ripe strawberries (cleaned and small dice)
- 1 tablespoon (13 g) fresh lemon juice
- 1 tablespoon (12 g) granulated sugar
For the Scones
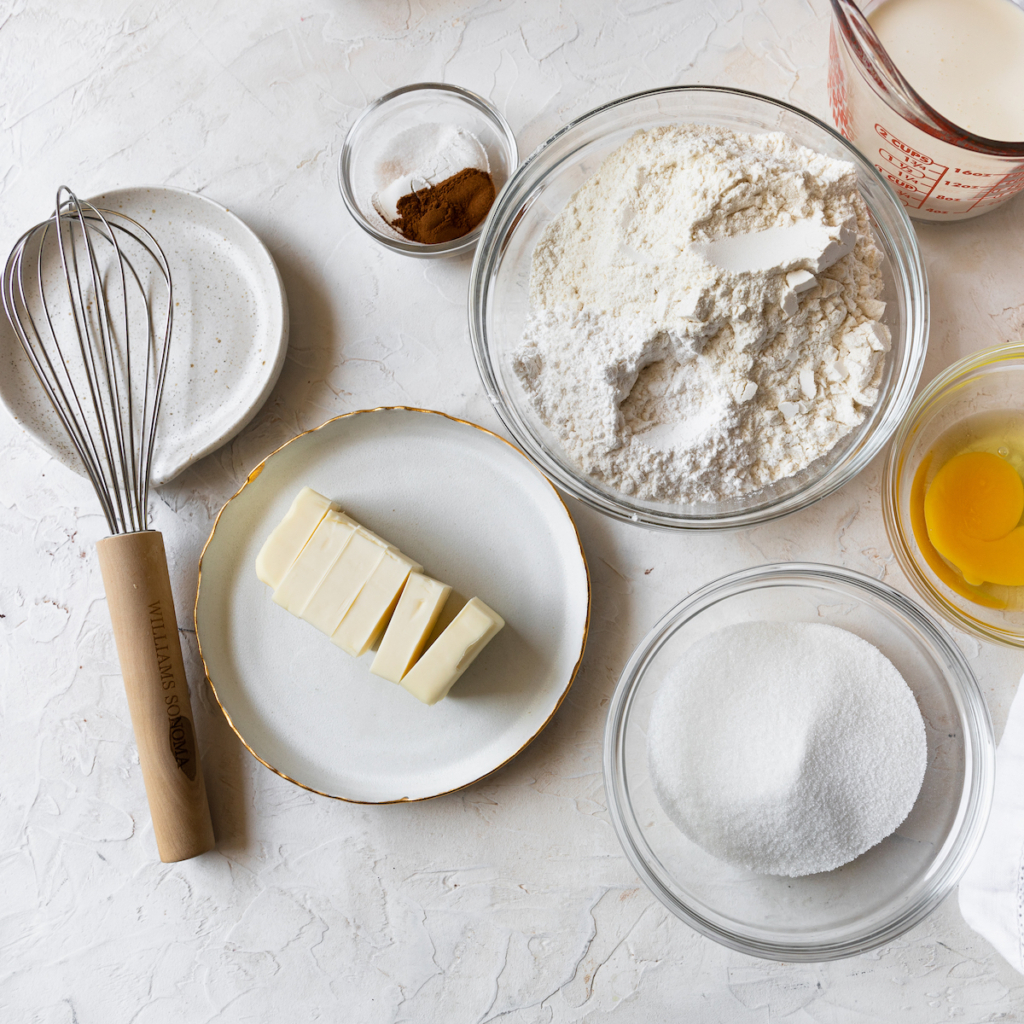
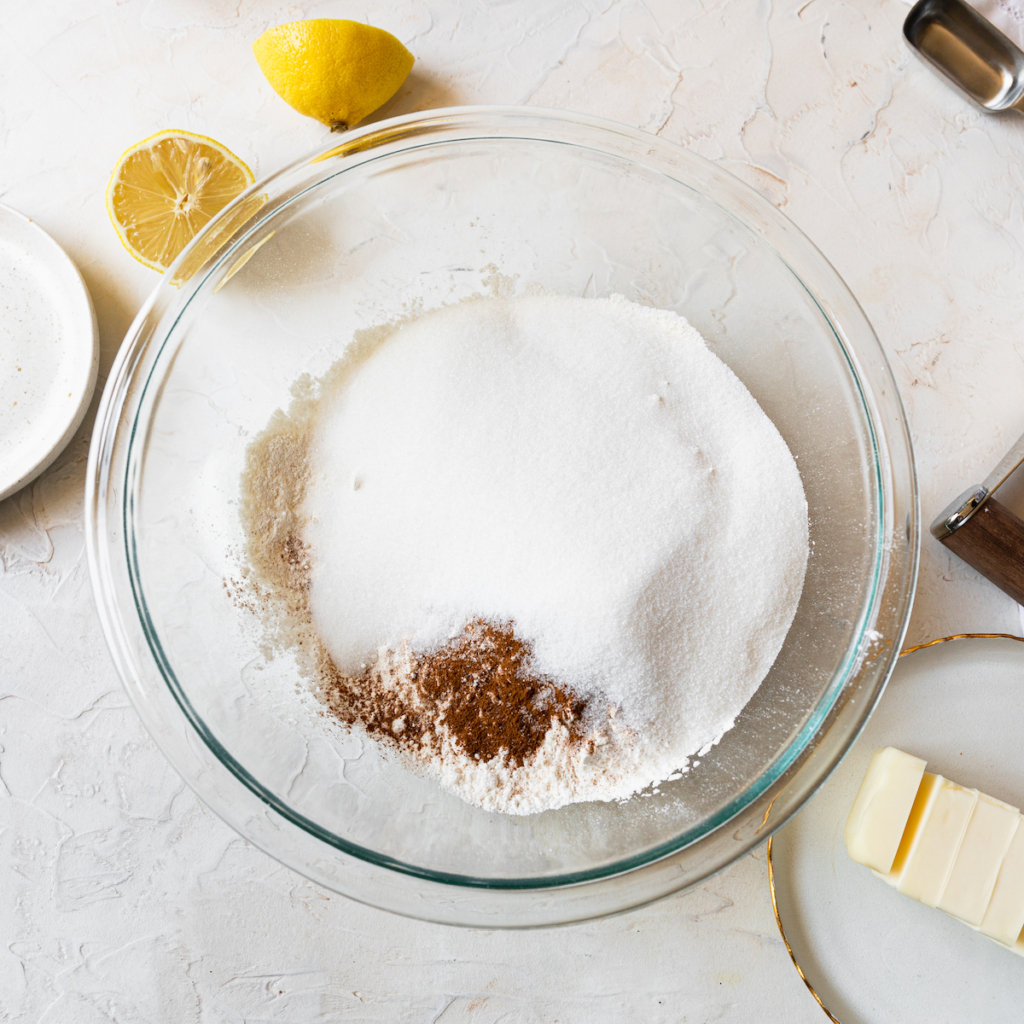
- 1 1/2 cups (187 g) cake flour (see note)
- 1 cup plus 3 tablespoons (162 g) all-purpose flour (how to measure flour)
- 2/3 cup (133 g) granulated sugar
- 1 tablespoon (15 g) baking powder
- 1/2 teaspoon sea salt
- 1 teaspoon cinnamon
- 8 tablespoons (113 g) unsalted butter (cut in 8 pieces, cold)
- 2/3-3/4 cup (160 to 180g) heavy whipping cream (cold; see note below)
- 1 large egg (cold)
For the Glaze
- 1 batch Fresh Strawberry Glaze
Instructions
For the Strawberries
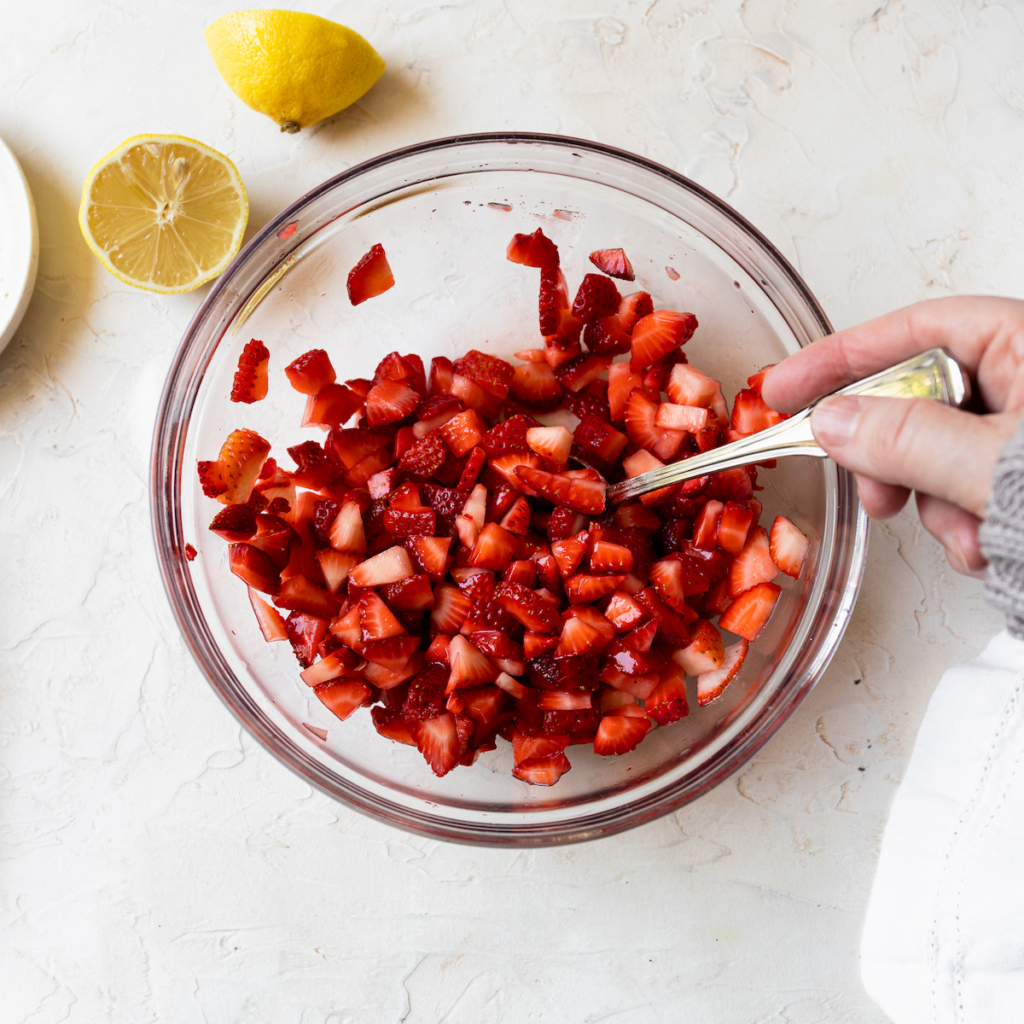
- In a medium bowl combine your chopped strawberries, lemon juice and granulated sugar, stirring periodically while you put together the scone dough.
For the Scones
- Line several baking sheets with parchment paper. Set aside.
- In a large bowl, whisk together the cake flour, flour, sugar, baking powder, cinnamon and sea salt. Cut the cold butter pieces into the flour mixture using a pastry cutter, two forks or your hands. I like to mix until I see small pieces, about the size of peas
- Mix the egg and 2/3 to 3/4 cup (160 g to 180 g) of cream together (see note about cream below) in a small bowl and then drizzle over the flour mixture. Using a fork, stirring until it just starts to form into a dough.
- Strain the strawberries, pressing out any excess moisture and reserving the liquid for the glaze (it's very important to get as much moisture out of the berries as possible, without smashing them). Add the berries to the scone dough.
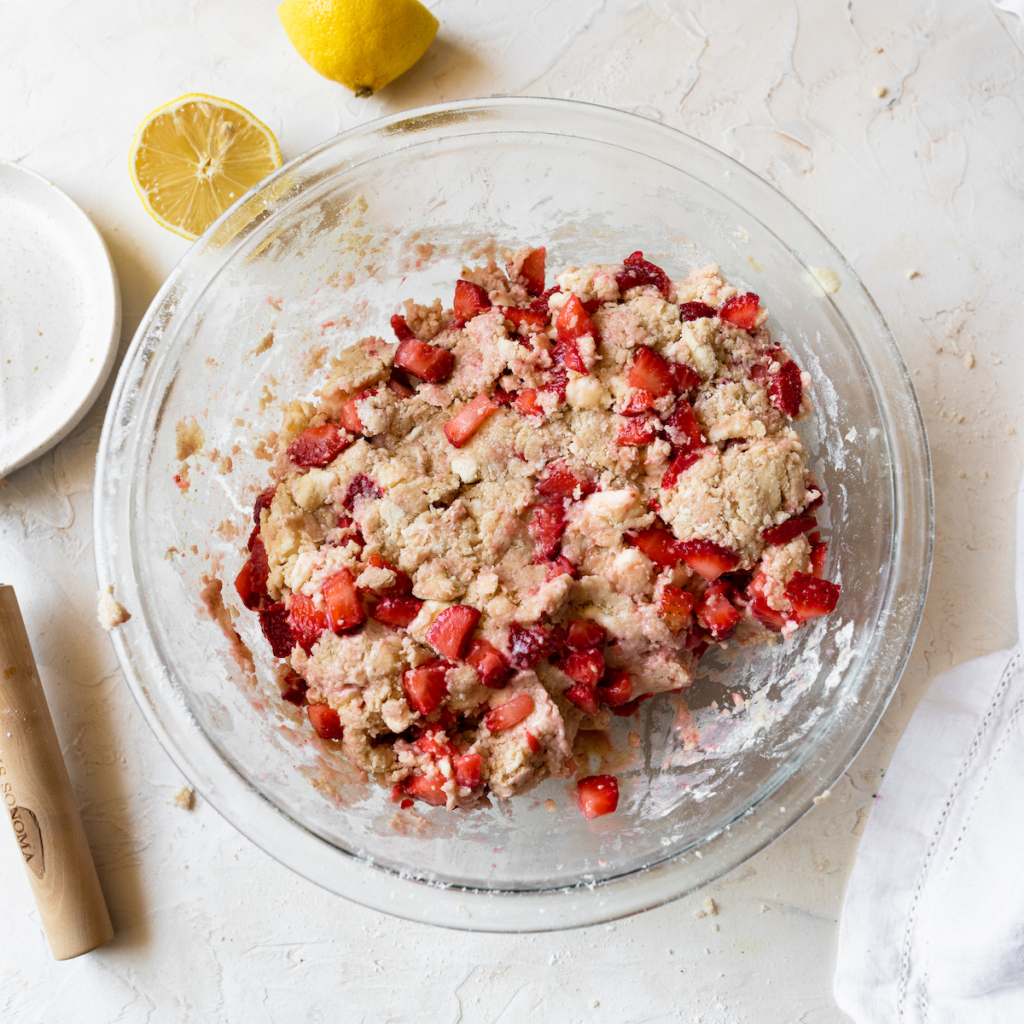
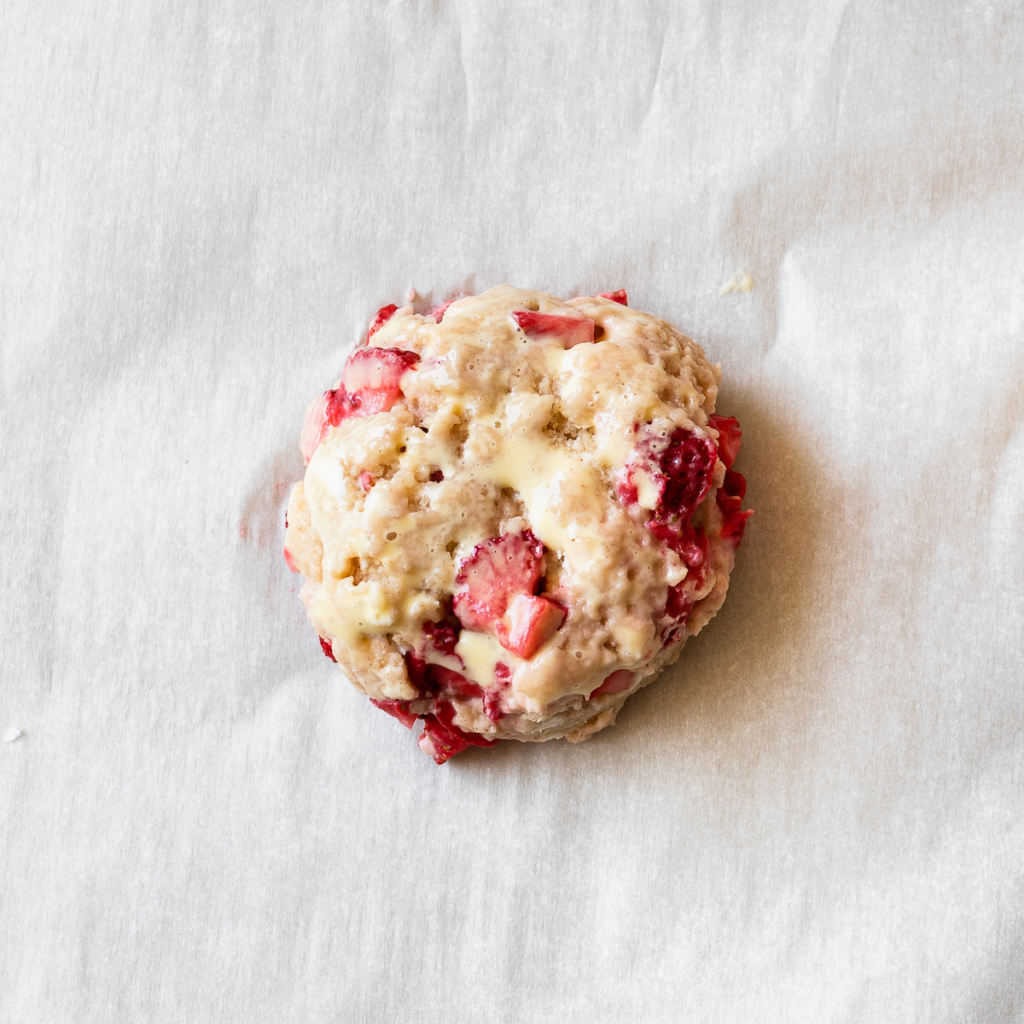
- I like to use a fold and press technique when adding the strawberries. Fold half of the dough onto itself and press down so that the berries are in the middle. Grab any rogue strawberries, set them on top of the dough heap and repeat the process until it looks just mixed. The addition of fresh fruit will make the dough a bit slick and snotty…don’t panic. It’s perfect.
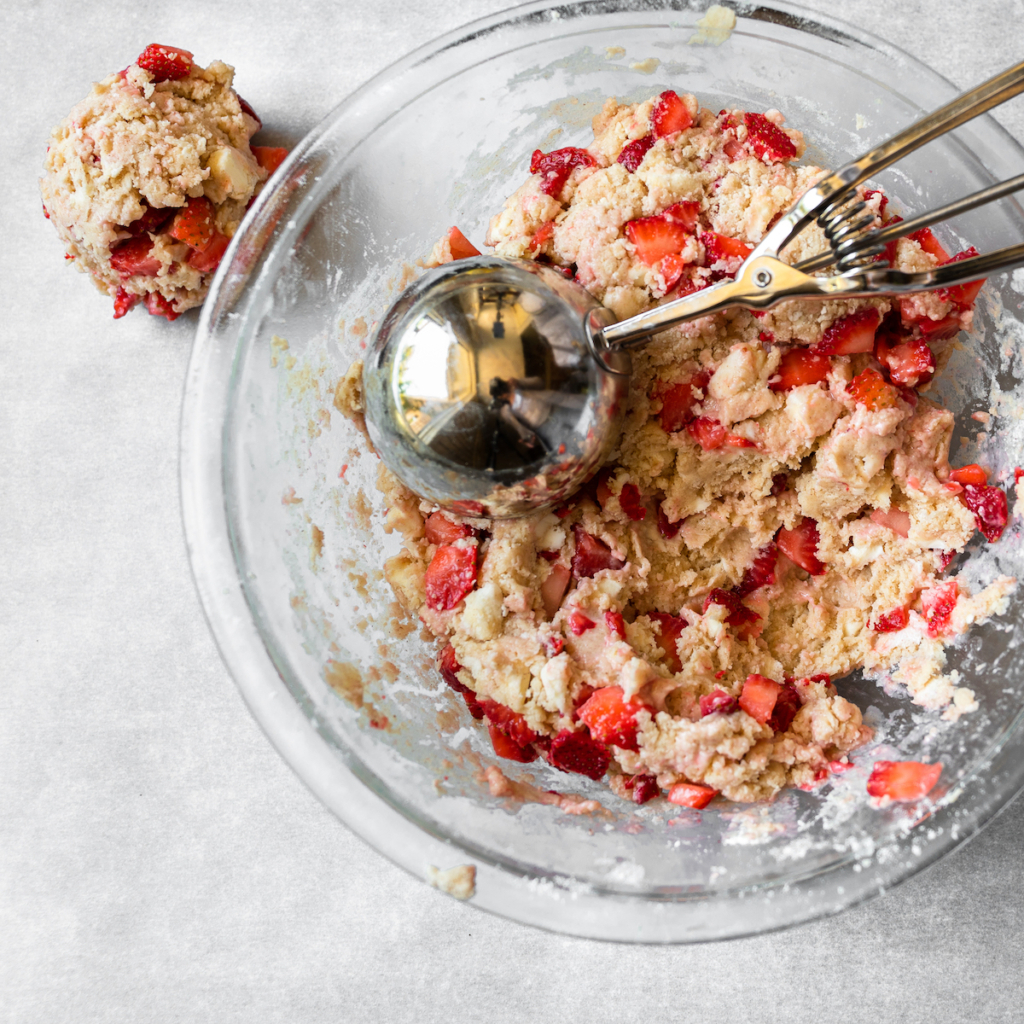
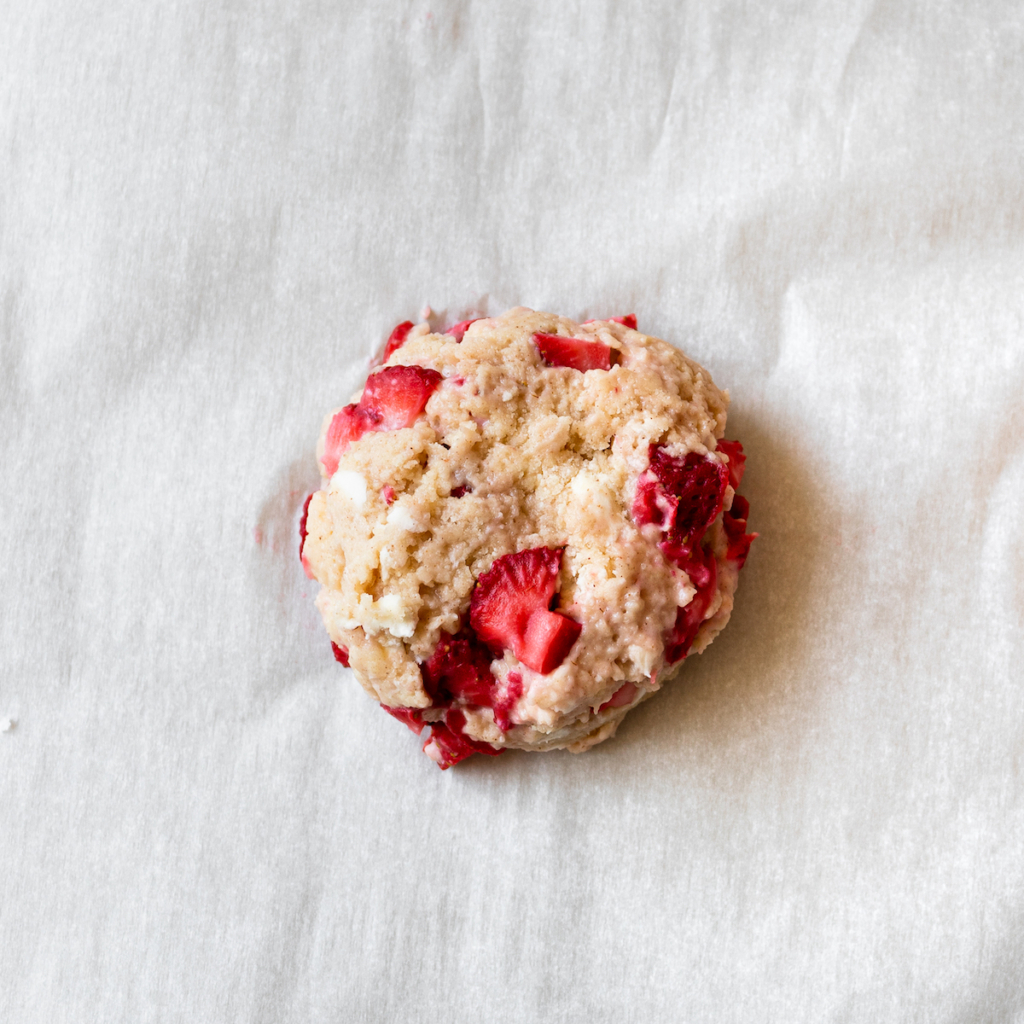
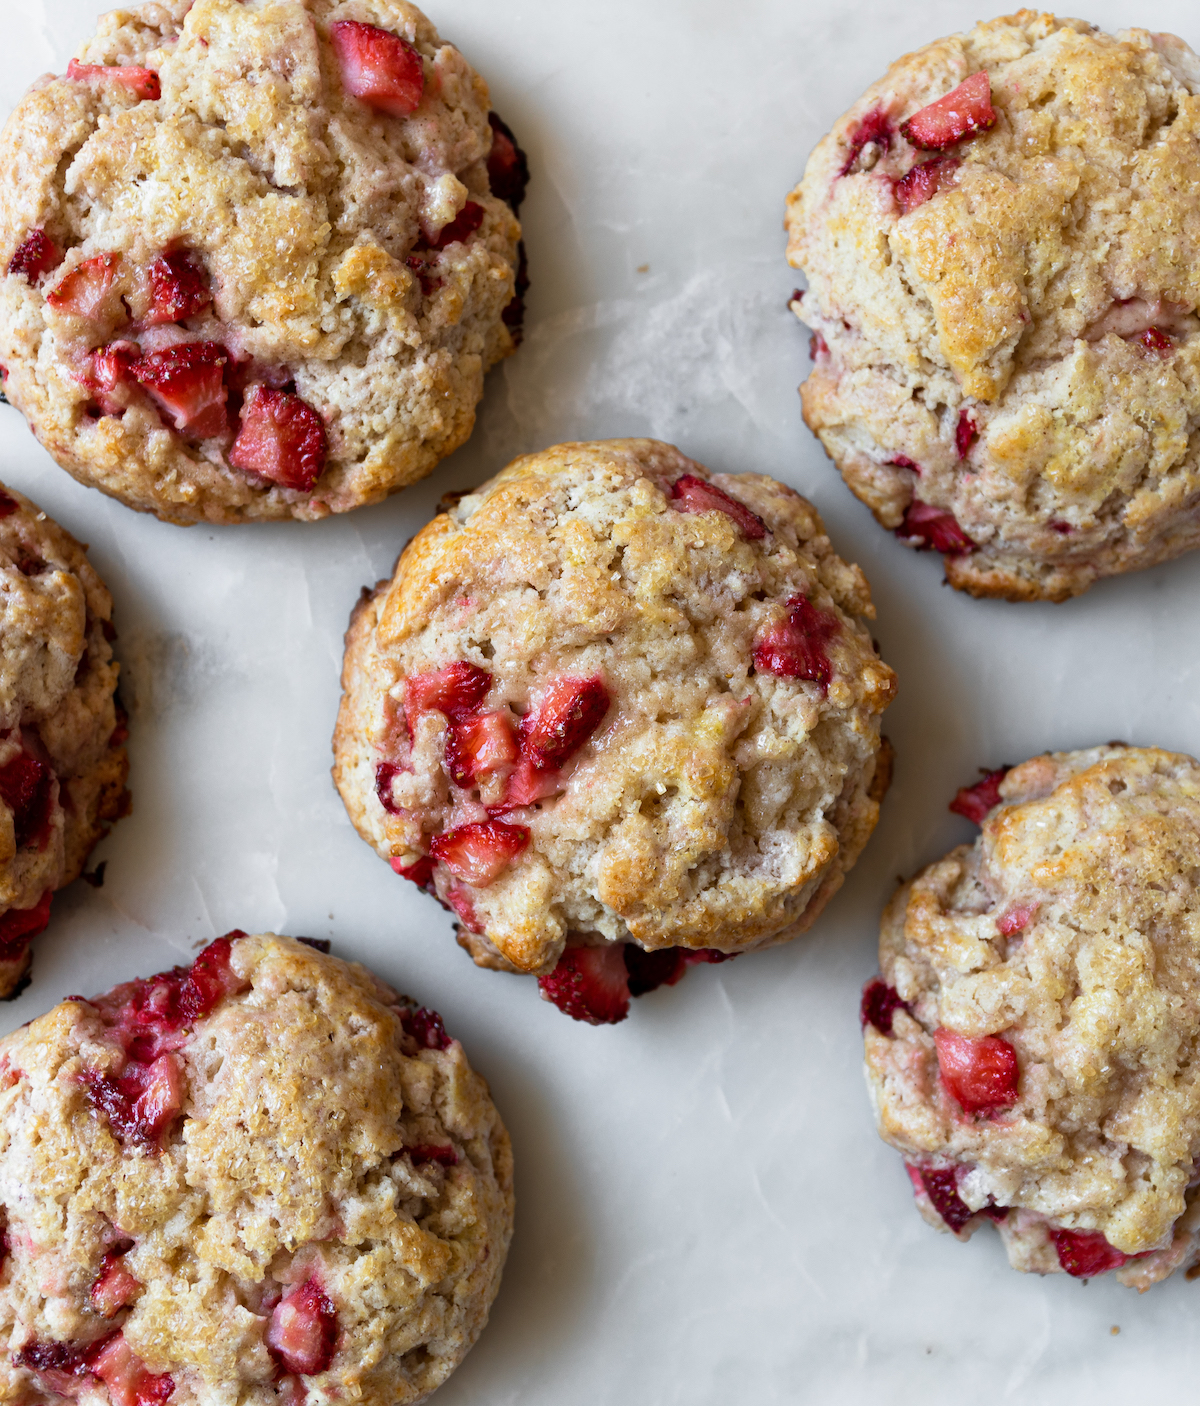
- Use a 1/2 cup muffin/cupcake scoop or 1/2 cup measuring cup to portion out eight mounds of dough on the prepared baking sheet leaving 3-inches (8-cm) between scones. Gently press down the tops to level a bit and press in any jagged areas on the sides of the scones. You want the dough cohesive, but not packed. Set in the freezer (or fridge) for 30 minutes and preheat the oven to 400℉ (204℃).
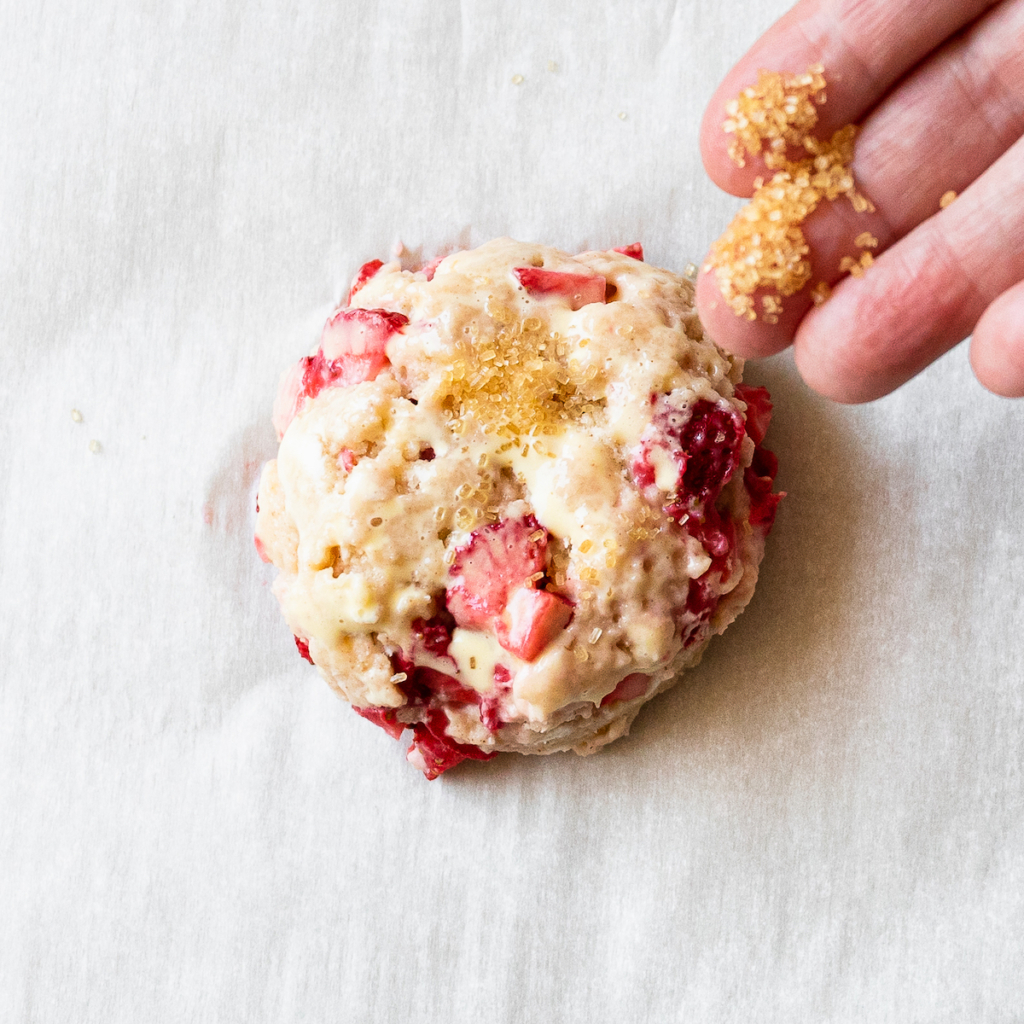
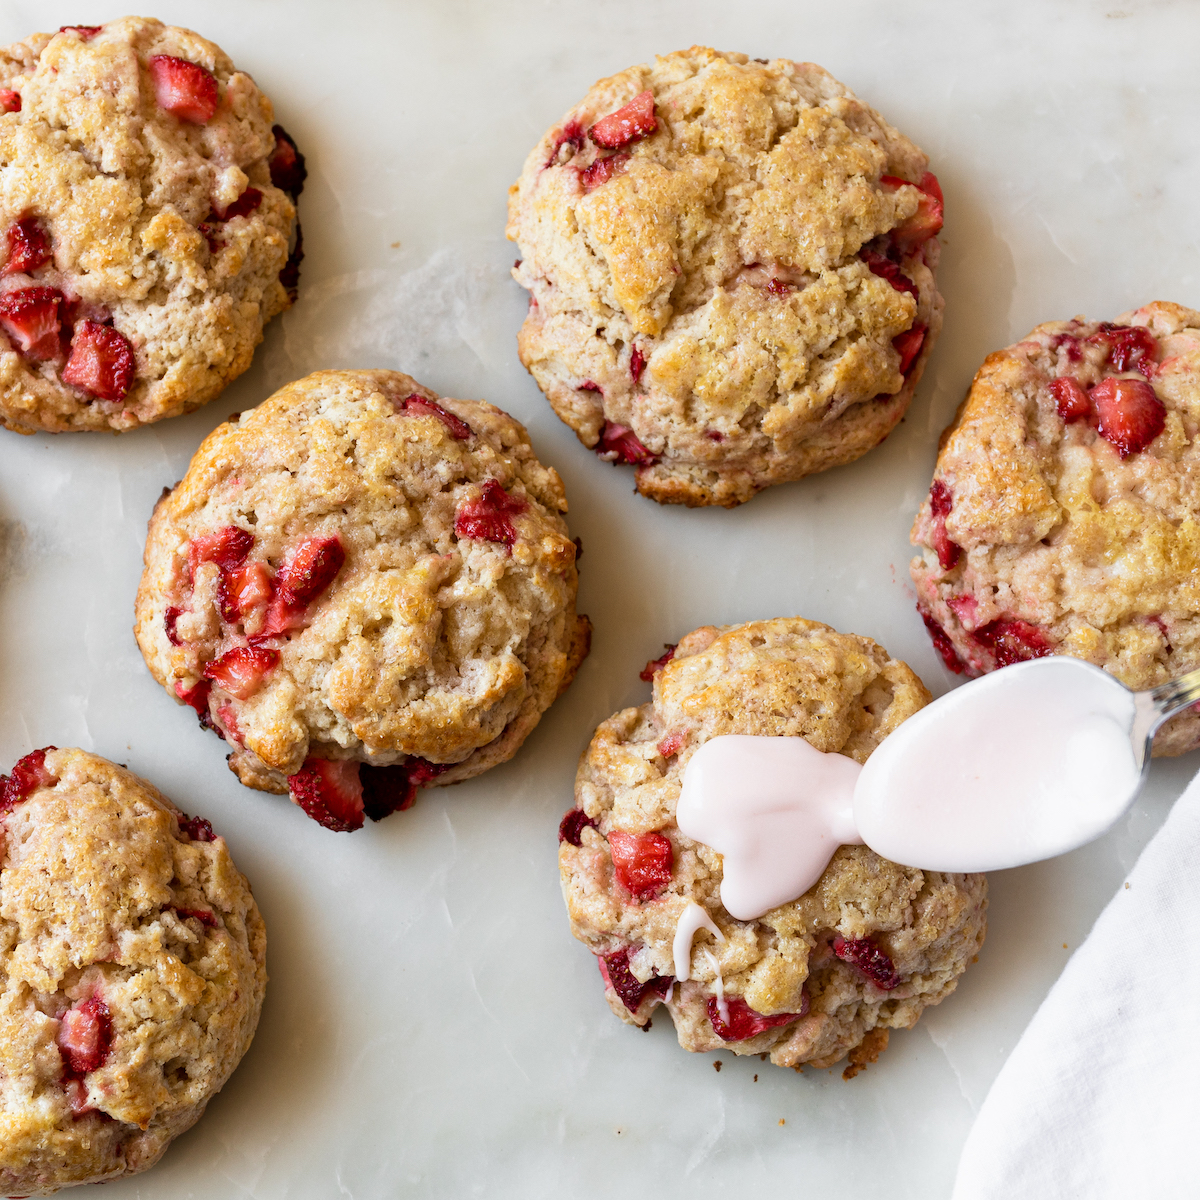
- Add the egg wash, if using (see note below), and sprinkle with Demerara sugar. Bake in the center of the oven for 19 minutes. When done they will be lightly bronzed around the edges and golden over the tops. Make sure the areas around the strawberries are baked through. Let them cool on the sheet, in a draft-free area, for about 15 minutes before removing to a rack to finish cooling. Let cool to room temperature before adding the glaze (if using).
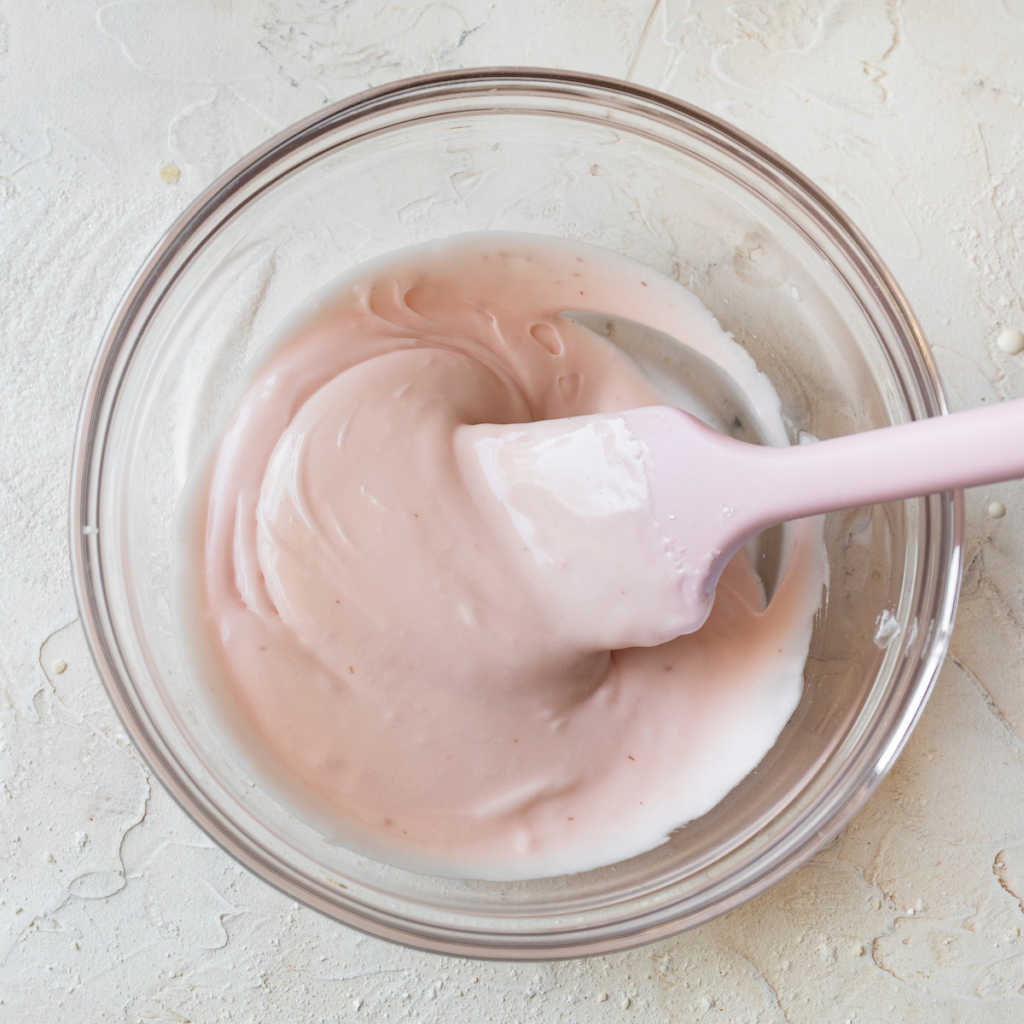
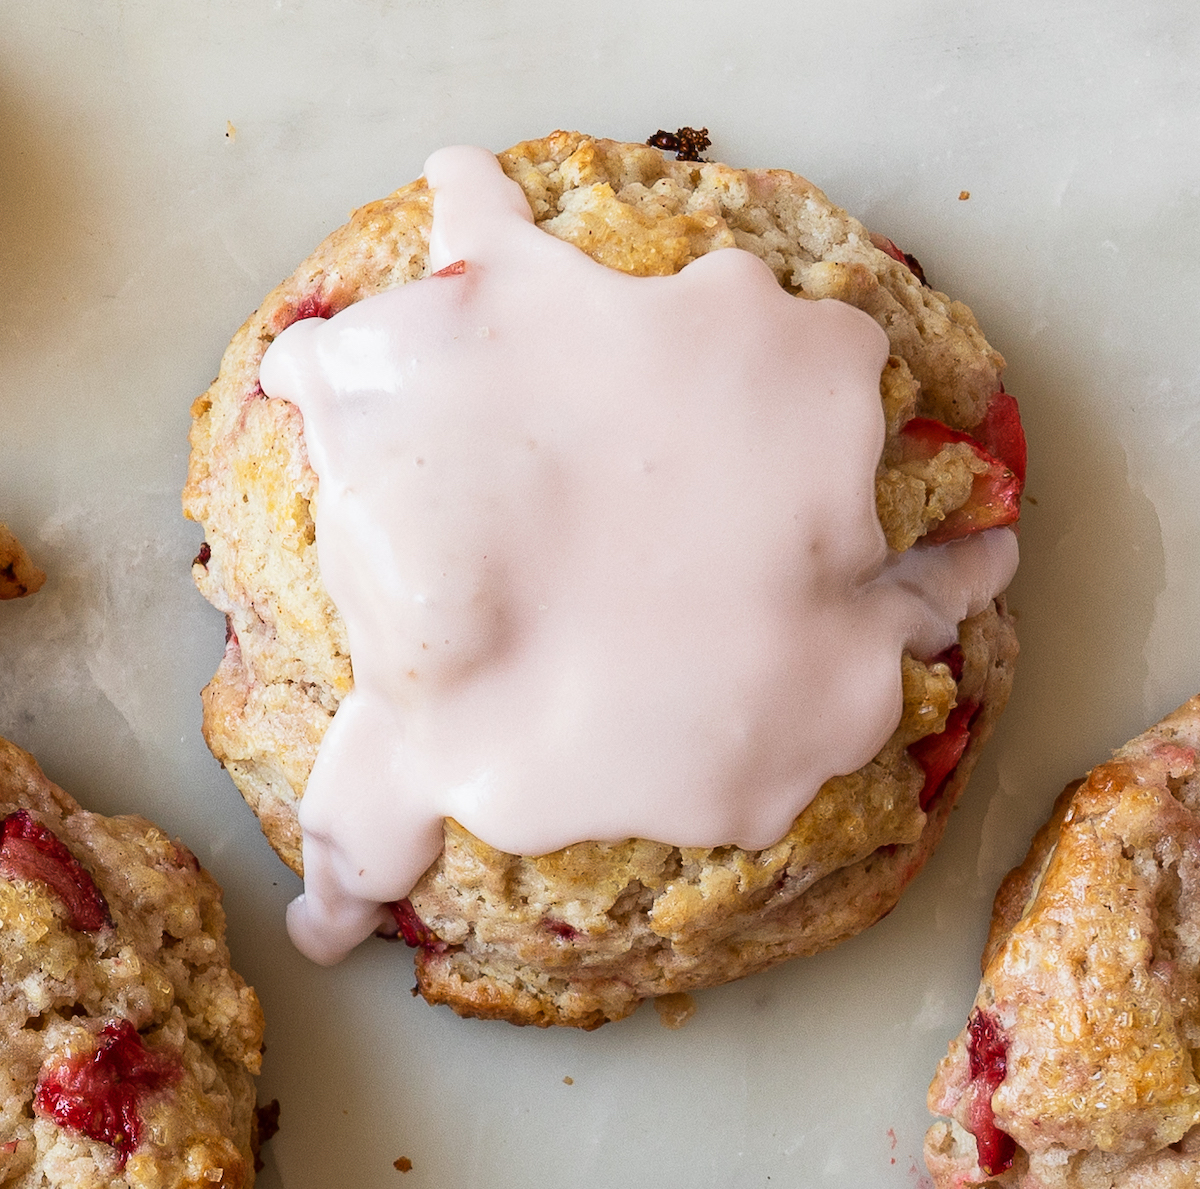
For the Strawberry Glaze
- While the scones cool, use the reserved strawberry juice to make the Strawberry Glaze. Once cool, grab a large spoon and smear the glaze over the tops of the scones. Serve immediately with any additional glaze on the side.
Video
Notes
Cake Flour
Cake flour makes these scones oh-so-tender. Can you use all-purpose flour in place of the cake flour? Absolutely! However, just know, you will lose some of that tenderness. If possible, get the cake flour when you’re picking up your fresh strawberries at the store.Glaze
You can use the Strawberry Glaze that goes with this recipe (and is mentioned throughout) or this Lemon Glaze recipe that goes with my blueberry scones!Egg Wash
If you’d like to use an egg wash (and skip the glaze), mix an egg yolk and 2 tablespoons of heavy whipping cream in a small bowl. Brush over the scones before they go in the oven; taking care not to let the wash pool in the scone crevasses. I like to sprinkle with Demerara sugar or sparkling sugar and then pop in the oven.Macerate Your Berries
You want to first give them a nice, small dice. Try to make each strawberry bite roughly the same size. Throw these in a bowl and toss with 1 tablespoon each lemon juice and granulated sugar. Stir periodically while you’re getting your dry ingredients together. When it comes time to add the berries to the strawberry scone dough, make sure you really strain them (reserving the liquid) by pressing as much moisture out as possible. You will later use the reserved liquid to make the glaze. Yes. You heard me. It’s going to be amazing.Heavy Whipping Cream
If you live in Palm Springs and there is zero humidity, use the full 3/4 cup (180 g) of cream. If you live in Hawaii, you probably only need 2/3 cup (160 g) of cream. If you live in a city with average humidity then use 2/3 cup plus 1 tablespoon of cream. I know this seems anal, but it’s important stuff. Nobody wants a dry scone. I’m going to start a new campaign: #humiditymattersBaking Powder
Use double acting baking powder for best results! xx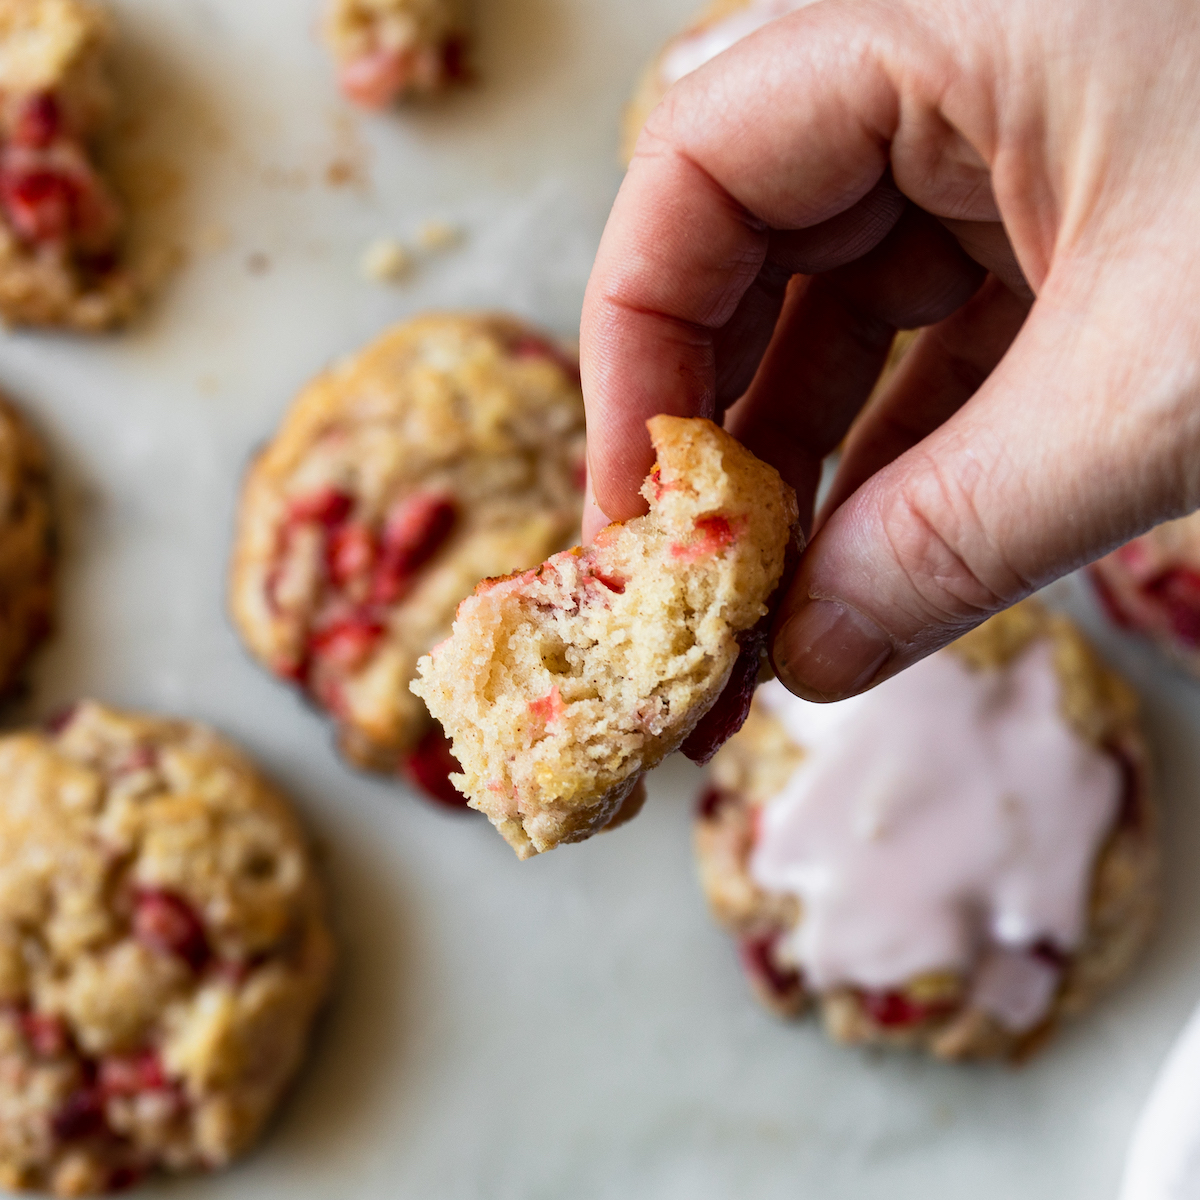


Baked these with the first organic strawberries of the season and they were excellent!
Thank you! I’m so happy you loved them!
R xo
Can these be frozen?
Hi Courtney!
Yes, these can be frozen. I freeze the unbaked scones on a baking sheet. Once frozen, I wrap tightly and store in an air tight container.
When ready to bake, unwrap and set on a prepared baking sheet. Then preheat the oven (they’ll start to slightly defrost). You’ll need to add on extra bake time so that they’re baked through. Check the area around the strawberries for doneness (that will be the last part of the scone to bake through).
Please reach out with anymore questions! xo
Yes! Do the campaign #humiditymatters!! If there’s one thing we have in MS, it’s humidity and it does matter. It changes so many things. Your expertise is welcomed.
Thanks Kim, it matters so much!!! xoxo
These look amazing! I love the strawberry glaze.
Thank you! It’s so yummy!! xo
YUM! I love scones and never knew how easy they could be, am so glad to have stumbled upon this recipe. A repeat for sure
This is the best recipe! Enjoy! xx
Be still my heart! These scones are the prettiest ever! <3
Why thanks Lady!! I feel the same about yours!! xox
i loved watching you make these on snap, and had a load of berries at the time but didn’t get around to making these. but i’m determined to this summer when i get my hands on some sweet little guys.
your experience with the farmers sounds just like something i would geek out on. i know how difficult they are to grow, and i have so much gratitude for those who have stuck it out. we reap such berrylicious benefits!
a+ on the tips about humidity, you are the scone master. xo
I hope you make these Amanda!! They are so bright and fresh. YUM!! I just had a request for a GF scones…so that’s my next project… stay tuned. Yay gratitude…I feel the same way. It’s HARD work!!! xoxoxo
I am all about these scones and I have this strawberry obsessed son that would positively flip his lid over this recipe. That glaze – oh my! Now I know what I’m doing this weekend!
Cathy, they are so good!!! I hope you love them!!! xoxo
You must have been the happiest little clam walking around that strawberry farm! I know I would have been! These scones are divine…every last bit of them! :)
Oh my gosh Annie, it was the funnest day!!! The farmer was the SWEETEST person ever. He said strawberries are shaped like hearts and are the color of blood. He was very eloquent. Great day. Thanks so much for the scone love…it’s the way to my heart!! xoxo
Oh my Rebecca, these look incredible!! I’ve never met a scone I haven’t loved!! And I can telll, I’m going to LOVE these!! That strawberry glaze looks amazing! Great idea to use the macerated berry liquid! Can’t wait to try!
Mary Ann! I’m a bit of a scone addict…if you hadn’t noticed. Let me know if you make them! I’d love your feedback!! xoxo
i love the color of the glaze! and #humiditymatters is so true; not just for scones, but all baked goods! i’ve definitely had finished desserts start to sweat and buckle and do gross things when the air is too wet.
Thank you Heather!! So so true on the humidity thing…and you’re right, it’s not just scones! xoxo