
You ever have one of those moments where you could not be happier? Filled up with goodness and love and everything that is great in your life? I was having that moment last night and my daughter said, ‘Why are you so happy?’ I told her I could go back to being the psychotic hormonal crazy lady I was a week ago, if she’d like? She said that wasn’t necessary. Truth be told, I was a psychotic crazy lady last week. Stressed beyond belief. Money, school starting, bills, sports, money, volleyball knee pads, new schools, new schedules, late school nights, back-to-school nights…did I mention money? But last night, I was just dandy. Just peachy. Mighty fine.
With school starting and the season changing everything is in this massive upheaval. Lots of change. Everywhere I turn. No more cucumbers in the garden…I can’t even talk about it. And yet, in the middle of it, I had a happy moment. The perfect shit show. Perfect.
Pizza is the perfect shit show, personified, for me. You might find this shocking, but gluten and dairy kill me. Just annihilate my stomach. Bloat me up like I’m nine month’s pregnant with triplets. It’s something to see. I’ve offered to eat a pizza and go into my gastro doc’s office just so he could watch the transformation with his very own eyes. Because really, I’m not doing it justice. He said he was fine, he got the picture.
So here is a food, beer crust pizza, that literally blows-up my intestines and yet it is my very favorite thing to make and eat. I love the way the dough gets all smooth and elastic and is all warm and snuggly. Like the perfect pillow. I’m grateful (insert praying emoji) every day that I’m not allergic to any of this…just intestinally annoyed by their mere existence. Somehow, that makes the entire meal that much more special. It’s like taking that fifth shot of tequila. You know you shouldn’t, but you do it anyway because it’s fun.
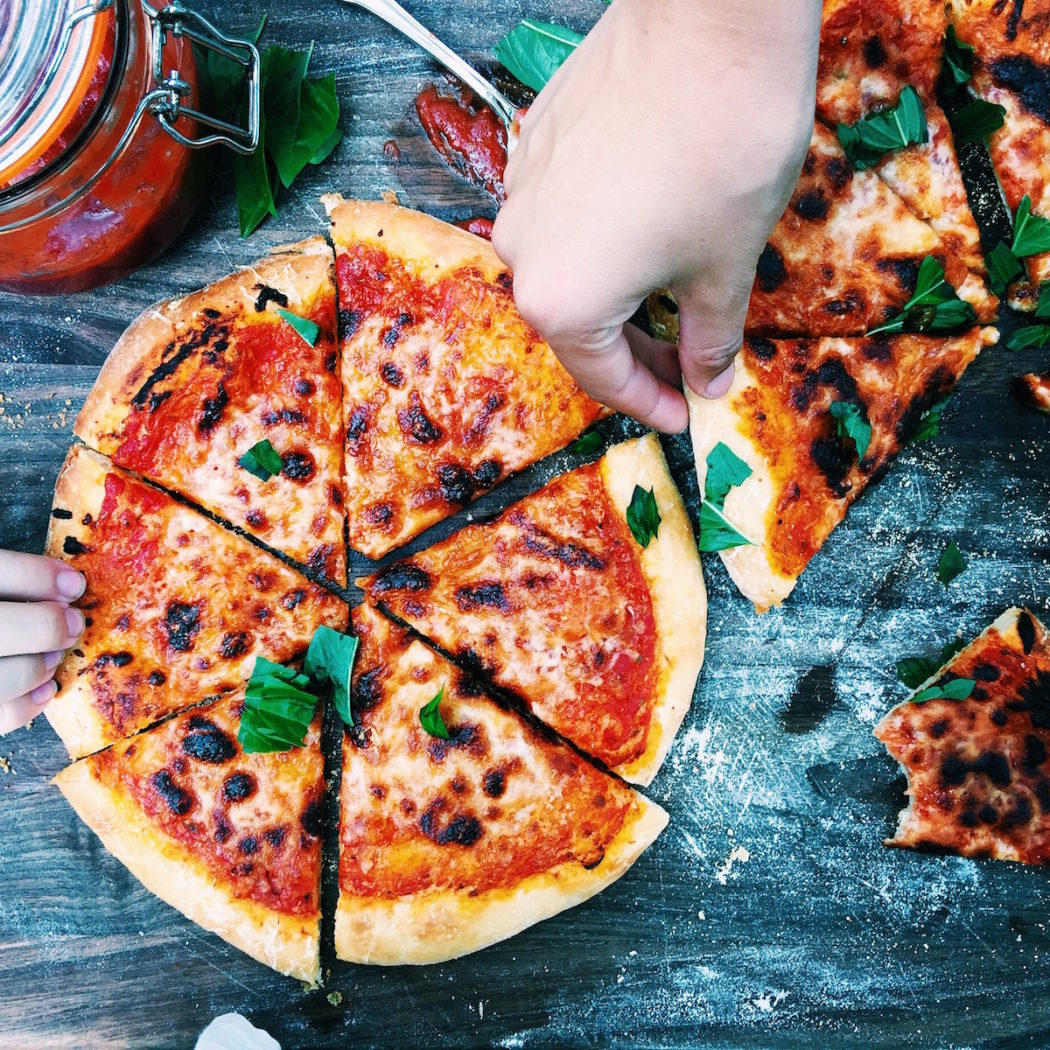
Back to beer crust pizza. I like starting weird traditions. My favorite was Chinese New Year in Beijing. On the first night of the holiday, we would have all of our friends over and cook a Mexican feast. We would make homemade tortillas, salsa, guacamole, enchiladas and margaritas and then go outside and explode tons of fireworks that we could never get our hands on in the US. Another perfect shit show. See, they’re everywhere. Now in the US, on Christmas Eve, I make homemade pizzas for my family. I gather as many traditional and odd toppings imaginable and then just make tons of pizzas and drink wine until late in the evening. It’s fun. It makes zero sense except that the primary colors are green (basil) and red (sauce). But it works. I think people shy away from making dough because it seems too time intensive. Some dough is, this is not. If it’s not easy, I won’t do it (most of the time). You should take some comfort in that. Considering my life is in shit show mode as we speak and I’ve still been able to squeeze in a handful of pizza nights should be an indication that yes, indeed, you too can make pizza dough.
P.S. All I wanted this summer was to make pizza on the BBQ. However, I ended up being a little too scared to put it directly on the BBQ grate. I didn’t want to spend my time making dough only to have it sink into the BBQ. I’m sure a simple Google search would have solved this dilemma, but that sounds too easy. Why would I want to simplify right now? Enter the pizza stone. I put the pizza stone on the grate and I tell you it created the best dang crust I’ve ever made. I like pizza in the conventional oven, but in the BBQ it was crisper and faster to cook. I’ll include both instructions below. Drumroll please…classic pizza. Enjoy the fireworks.
{ Also check out Harissa Pizza with North African Sausage + Feta }
Beer Crust Pizza
Makes Three Large or Six Individual Pizzas
INGREDIENTS
For the Dough
- 1 12-ounce bottle of warm beer; put the beer bottle in a bowl with hot water for around 30 minutes to get it to the desired temperature. You want it to be pretty warm to set off the yeast. UPDATE: I really prefer a light beer in this beer crust recipe…think Budweiser or Corona. But feel free to experiment with your own palate!
- 2 packages dry yeast
- 1 1/2 tablespoons honey
- 3 tablespoons olive oil, plus more for the bowl. Go high-grade oil for the dough and you can step it down for the olive oil needed to lube up the rising bowl.
- 4 cups of 00 Flour or all-purpose flour, plus more for dusting. The 00 Flour is more expensive and the other will do fine. You could also use the 00 flour for the dough and the all-purpose for dusting if you want to cut back a bit money-wise.
- 4 teaspoons of salt
- Cornmeal for dusting underneath the dough, pre-oven or BBQ
For the Sauce
- 15 ounce-can of tomato sauce. Get the good stuff. I do go by this adage, if something you’re making has few ingredients then get the tastiest ingredients possible. It really does make a difference. I think.
- 1 1/2 tablespoons dried oregano
- 3 tablespoons olive oil
- 2 teaspoons (or more) of salt. Taste the sauce, you’ll know what to do.
- I garlic clove, pressed
For the Toppings
- This is where you can get frisky. Sky’s the limit here. I get pre-shredded mozzarella. I’m assuming most of you are busy as hell. You don’t want to shred cheese after a long day. You could always get buffalo and slice it. Why is grating cheese such a chore? Basil leaves… I went totally cray the other day and thought I was so creative with a pear, rosemary and gruyere beer crust pizza. Until my mom told me that was her favorite pizza at CPK. And then I felt totally uninspired.
INSTRUCTIONS
For the Dough
- I like to start this about 2 1/2 hours before I want to eat.
- Run your stand-up mixer bowl through some hot water to warm it up a bit. Dry and put in your stand mixer fitted with the dough hook attachment. Is your kitchen warm? You don’t want it to be drafty…find a nice, snuggly place for your dough to rise. File this location away for 15-20 minutes from now.
- Put the beer, yeast, honey and olive oil in the bowl of your mixer. Let them mingle and get frothy. Give them a little spin around the bowl with the dough hook to make sure they’re nice and intertwined. Forever attached from this point forward.
- Once they are foaming up, add 3 cups of your flour. Sprinkle in your salt. Start your dough hook on a low speed and work your way up to a low medium. If you start out too fast the flour will fly everywhere. I know, I do it every time. Set your timer for 10 minutes. During this time, periodically check in on your dough and sprinkle more flour (up to one cup ) in the bowl to keep it from sticking. If it’s humid out, you’ll need more flour. If you live in the desert, you’ll need less.
For the Sauce
- Mix all of the sauce ingredients in a non-metallic bowl. Taste…does it need more salt? Oregano? Olive oil? I get pretty aggressive with these three ingredients. Add more in little bits until you hit your sweet spot. There. Did you find it? Cover with plastic wrap and set aside. I like to do this in a glass bowl because it’s pretty. If anything I’m cooking looks pretty, I don’t want to put it away. I want it on the counter. To admire. Like my own little edible, non-masterpiece artwork.
Back to the Dough…
- Check on the dough. Has a ball formed? Is it smooth? Is it elastic? If it’s sticky and not ball-like, keep the dough hook going and add flour. Don’t be shy. As soon as a ball has formed and nothing is sticking to the sides, turn off your mixer. If it’s sticking just a little to the sides (or to your hands), add a little more flour so that you have a nice, round, non-sticky ball.
- Run hot water over another bowl. Let’s call this your rising bowl. Get it all nice and warm and then dry it off. Pour a glug of olive oil in there and swirl it all around so that the dough won’t stick.
- Put your beautifully warm dough ball in the warmed bowl. Cover with a clean towel. If it’s dry where you live, you might consider dampening the towel a bit so that the dough doesn’t start to dry around the edges.
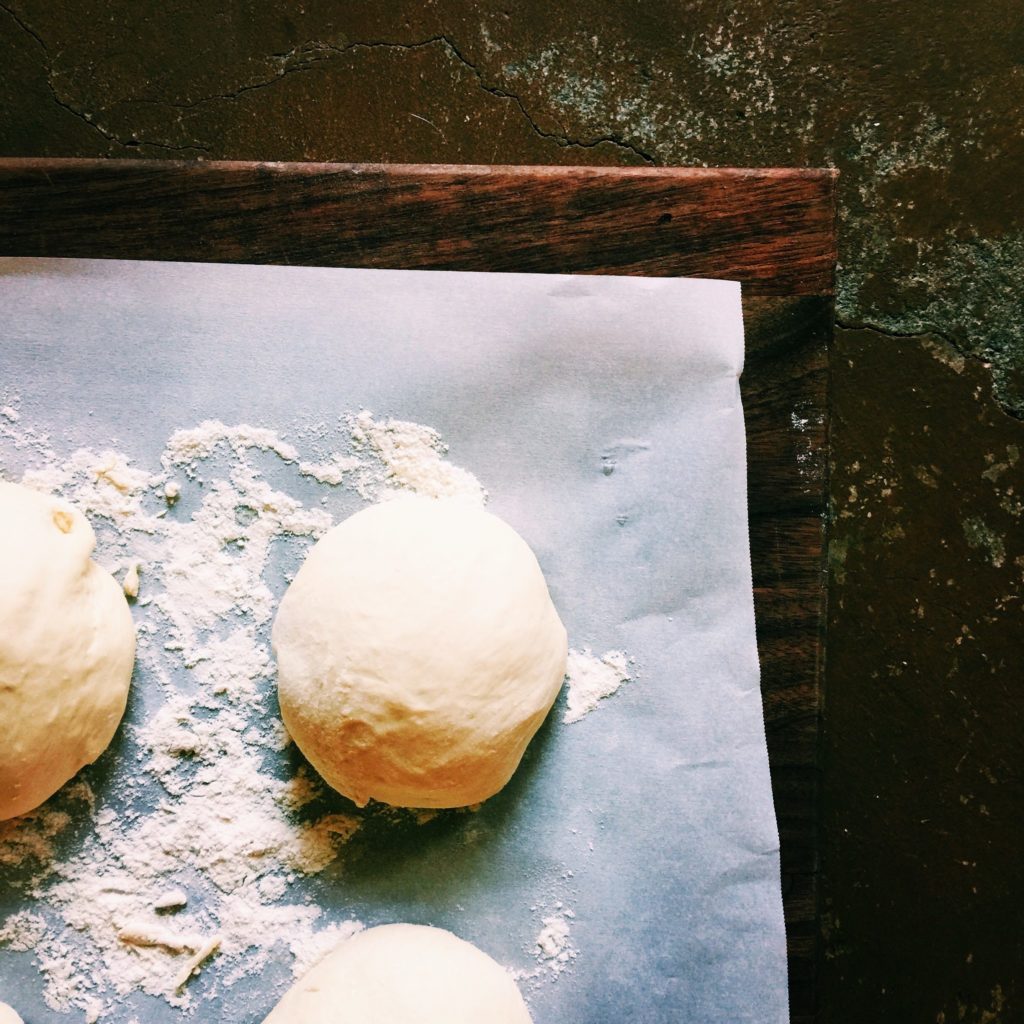
- Remember that cozy, draft-free real estate you were eyeballing for the rise of said dough? Go put your dough there. Take a quick photo of the dough with your phone.
- Set the timer for 60 minutes and forget about it. Go take a nap. Or watch some telly. Or take your kid to their after-school activity. Just be sure to come back in 60 minutes.
- After your timer has gone off, look at the picture you took and then look at your dough. Has it doubled in size? If no, cover it back up to rest a little more. Rising is hard work.
- If it has doubled, pull out a baking sheet and cover it with parchment paper (if you can love parchment paper, I love parchment paper). Give it a light dusting with some flour.
- Separate your dough into 3 or 6 equally-sized dough balls. I like 6 because it feeds everyone and there is always leftovers. Even though it’s the same amount of dough, 3 never seems to go as far as 6. If it got a little sticky, very lightly sprinkle it with some flour so that it doesn’t stick to anything.
- Cover it with the same towel and put it back in its’ resting spot. Set the timer for 60. Take another nap or go pick up your kids and taxi them around wherever it is that they need to be. I’m not alone in this, right? How is anyone supposed to get dinner done with all this travel?
- After 60 minutes, you’re ready for primetime. Either heat your oven up to 500 degrees F., or heat up your BBQ, with the pizza stone in it, to a medium flame.
To Assemble
- I like to use my hands to get a decent disc shape with each dough. Then I put it down on a lightly floured surface (that has a sprinkling of cornmeal mixed in it) and roll out the rest. You don’t want it paper thin. I love thin crust too, but it will end up soggy and seepy if you do this. You don’t want to be able to see through it.
- You’re thinking you want lots of sauce, but you really don’t. A little really does go a long way and you don’t want to get soggy at this step either. Our goal is a crisp beer crust. Repeat: CRISP beer CRUST.
- Same rule goes with the cheese…you don’t need as much as you think…it will just ooze over the sides and it won’t be pretty anymore. I like to add some cheese, a little topping and then a little more cheese.
On the BBQ
- Take your beer crust pizza out to the BBQ on a cutting board or cookie sheet. Make sure it is not sticking otherwise the transfer into the inferno-like grill will burn your eyebrows right off of your face. I use a spatula to help me do a combo slide and lift onto the pizza stone. The first time I did it I sucked. I finally found a groove. You’ll get there. I wouldn’t drink at this point. Wait until you’ve mastered the transfer. Should I have mentioned that earlier?
- Each beer crust pizza will take about 8 minutes. Gorgeous. Adjust the heat as you go if they’re getting a little too done or vice versa. And put the lid down for crying out loud…we’re re-creating our very own pizza oven here.
- Let each beer crust pizza cool for about 5 minutes on a cooling rack. This also helps keep the soggy-crust blues away.
For the Oven
- Put your beer crust pizza on the baking sheet, no parchment paper, with a sprinkle of cornmeal between the crust and the sheet.
- Bake for 12-15 minutes. Start watching around 12 minutes to gauge how your oven is cooking these guys.
- Same as the BBQ method, let cool a wee bit on the cooling rack to firm up and let the cheese calm down.
A final, exciting note. The last time I made beer crust pizza I got tired of making pizza (I had doubled the batch). So I rolled them out, placed them between parchment paper (again, lightly floured so no one is sticking), wrap tightly in plastic wrap, then foil and then put in a freezer bag. Seems like a lot of layers but you don’t want freezer burn. I pulled them out a couple of days later, let them come to room temperature (no longer cool to the touch on either side) and cooked as normal and they came out great. Yeah, I was pretty excited about this. One last tip if you double the recipe…during the first rise, split the dough in two and put them in separate bowls. Trust me, if you leave it as one big heap of dough it will get really big and unmanageable.
OK, now you can drink.

Beer Crust Pizza
Ingredients
- For the Dough:
- 1 12- ounce bottle of warm beer*
- 2 packages dry yeast
- 1 1/2 tablespoons honey
- 3 tablespoons olive oil (plus more for the bowl)
- 4 cups of 00 Flour or all-purpose flour (plus more for dusting**)
- 4 teaspoons of salt
- Cornmeal for dusting underneath the dough (pre-oven or BBQ)
- For the Sauce:
- 15- ounce can tomato sauce
- 1 1/2 tablespoons dried oregano
- 3 tablespoons olive oil
- 2 teaspoons or more salt
- I garlic clove (pressed)
- Toppings
Instructions
- For the Dough: I like to start this about 2 1/2 hours before I want to eat.
- Run your stand-up mixer bowl through some hot water to warm it up a bit. Dry and put in your stand mixer fitted with the dough hook attachment.
- Put the beer, yeast, honey and olive oil in the bowl of your mixer. Let them mingle and get frothy. Give them a little spin around the bowl with the dough hook to make sure they're nice and intertwined.
- Once they are foaming up, add 3 cups of flour. Sprinkle in salt. Start your dough hook on a low speed and work your way up to a low medium. Set your timer for 10 minutes. During this time, periodically check in on your dough and sprinkle more flour (up to one cup) in the bowl to keep it from sticking. If it's humid out, you'll need more flour. If you live in the desert, you'll need less.
- For the Sauce: Mix all of the sauce ingredients in a non-metallic bowl. Taste and adjust seasonings. Cover with plastic wrap and set aside.
- Back to the Dough: Check on the dough. Has a ball formed? Is it smooth? Is it elastic? If it's sticky and not ball-like, keep the dough hook going and add flour. Don't be shy. As soon as a ball has formed and nothing is sticking to the sides, turn off your mixer. If it's sticking just a little to the sides (or to your hands), add a little more flour so that you have a nice, round, non-sticky ball.
- Run hot water over another bowl, then dry it off. This is where your dough will rise. Pour a glug of olive oil in there and swirl it around so that the dough won't stick.
- Put your beautifully warm dough ball in the warmed bowl. Cover with a clean towel. If it's dry where you live, dampen the towel a bit so the dough doesn't dry around the edges. Put your dough in a warm place. Take a quick photo of the dough with your phone.
- Set the timer for 60 minutes and forget about it. After your timer has gone off, look at the picture you took and then look at your dough. Has it doubled in size? If no, cover it back up to rest a little more. If it has doubled, pull out a baking sheet and cover it with parchment paper. Give it a light dusting with flour.
- Separate dough into 3 or 6 equally-sized dough balls. If it got a little sticky, very lightly sprinkle it with some flour so that it doesn't stick to anything. Cover it with the same towel and put it back in its resting spot. Set the timer for 60. After 60 minutes, you're ready for primetime. Either heat your oven up to 500 degrees F, or heat up your BBQ, with the pizza stone in it, to a medium flame.
- To Assemble: I like to use my hands to get a decent disc shape with each dough. Then I put it down on a lightly floured surface (that has a sprinkling of cornmeal mixed in it) and roll out the rest. You don't want it paper thin. I love thin crust too, but it will end up soggy and seepy if you do this. You don't want to be able to see through it.
- Cover with sauce, but not too much because you don't want the crust to be soggy here either.
- Same rule goes with the cheese...you don't need as much as you think...it will just ooze over the sides and it won't be pretty anymore. I like to add some cheese, a little topping and then a little more cheese.
- On the BBQ: Take your beer crust pizza out to the BBQ on a cutting board or cookie sheet. Make sure it is not sticking otherwise the transfer into the inferno-like grill will burn your eyebrows right off of your face. I use a spatula to help me do a combo slide and lift onto the pizza stone. Each beer crust pizza will take about 8 minutes. Adjust the heat as you go if they're getting a little too done or vice versa. And put the lid down for crying out loud...we're re-creating our very own pizza oven here. Let each beer crust pizza cool for about 5 minutes on a cooling rack. This also helps keep the soggy-crust blues away.
- For the Oven: Put your beer crust pizza on the baking sheet, no parchment paper, with a sprinkle of cornmeal between the crust and the sheet. Bake for 12-15 minutes. Start watching around 12 minutes to gauge how your oven is cooking these guys. Same as the BBQ method, let cool a wee bit on the cooling rack to firm up and let the cheese calm down.
Notes
**The 00 Flour is more expensive and the other will do fine. You could also use the 00 flour for the dough and the all-purpose for dusting if you want to cut back a bit money-wise.
Follow me on Instagram | Pinterest | Twitter | Food52 Email me | [email protected]
I’m really late to the party on your blog and this recipe, SORRY!! I found you via Wood & Spoon, which I also love. So glad I found both of you!
Just a quick question, can you freeze this dough?
Thank you!
I love Kate @ Wood & Spoon — and I’m so glad you found me!
Sooo…I have never frozen this dough. I’m not sure what that would do to the yeast???? I would be more inclined to make + bake the pizzas and then freeze them…like frozen pizzas…that you could just pop out of the freezer and give a quick blitz in a hot oven??? If you do this, make sure to wrap them super tight so they don’t get freezer burn.
If you try it I hope you’ll come back and report!!
R xoxo
Thank you for responding. I ended up using instant /rapid rise yeast. The pizza came out fantastic! It was so delicious, but it kind of tastes like beer too much for my taste. I’m just going to play around with the kind/type of beer I use in the recipe. My parents and my sister really loved it. It was so easy to make and tasted great, it has definitely become my go to pizza dough.
I’m so glad you liked it!!! I like Corona…even Budweiser in it. Fancy beers are too strong for me!!! ;) Xo
This looks super delicious. Do you use instant yeast or active dry yeast?
Hi Denise! You could use either…I toggle between the two all of the time and it’s fine. I don’t do anything different. It’s really a great pizza dough. Let me know how you like it! xoxo
I’d love to have a pizza with you sometime! I’m going to try using the grill; sounds fantastic. And what’s wrong with saying “crap?” I say much worse and on a regular basis. Enjoy the last days of summer. (But since you are in California, that’s probably a ridiculous thing for me to say. )
Sinead that would be so much fun!!! So, this post was two years ago…if you can believe it…I can’t. Time is screaming by…my kids were so much smaller then. Crap was a big deal back then. Now, everyone is all ‘meh.’
Yes, summer never ends here…let’s hope we get more rain this year…that would be nice… I hope you love the pizza!!! xoxo
Your writing is fantastic!! I feel like I’m totally hanging out with you having pizza! Can’t wait to try this recipe!
Why thanks dear!!! I hope you do and I’d love to hear how it goes!! xoxo
Your pizza is my FAVORITE. And you are a funny shit show. xoxo